 PH
PHjcdgreatest
Fanatic
This is in preparation of the upcoming updates on https://phcorner.org/threads/2566671/#post-31727418 - DAY 3.
OVERVIEW of Arduino IDE
The Arduino Integrated Development Environment (IDE) is a free, open-source software used to develop programs for Arduino-compatible microcontrollers. It provides a simple and user-friendly interface where programmers can write, compile, and upload code, known as sketches, to a microcontroller board. Because of its simplicity, the Arduino IDE is widely used by beginners, hobbyists, students, and professionals in embedded systems development.
An Arduino sketch is primarily composed of two functions: setup() and loop(). The setup() function is executed only once when the microcontroller is powered on or reset, making it ideal for initializing hardware such as input/output pins, serial communication, Wi-Fi connections, and sensors. The loop() function runs continuously after setup() has finished, allowing the microcontroller to repeatedly monitor inputs, process data, and control outputs.
The Arduino IDE also includes tools for verifying (compiling) code, uploading programs to the microcontroller, and debugging applications using the Serial Monitor. Additionally, it supports thousands of libraries that simplify interfacing with sensors, displays, communication modules, and other electronic devices, significantly reducing development time.
One of the strengths of the Arduino IDE is its broad hardware compatibility. Besides official Arduino boards, it supports popular microcontrollers such as the ESP8266 (ESP-12) and ESP32, making it suitable for Internet of Things (IoT) and wireless communication projects.
In this project, the Arduino IDE serves as the primary software development environment for programming the ESP-12 microcontroller, which manages the coin slot, relay control, Wi-Fi communication, and interaction with the MikroTik router. Its ease of use, extensive library support, and rapid development capabilities make it an effective platform for implementing and testing the embedded control system used in the DIY Piso WiFi project.
You do not have permission to view the full content of this post. Log in or register now.
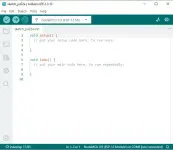
Upon installation we need to have the following.
1. Divers for You do not have permission to view the full content of this post. Log in or register now. this will recognized your ESP board
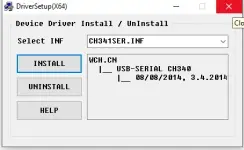
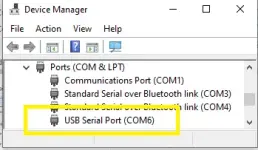
2. Board Manager
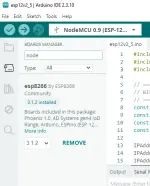
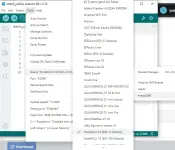
3. Steps on updating board for esp8266
OVERVIEW of Arduino IDE
The Arduino Integrated Development Environment (IDE) is a free, open-source software used to develop programs for Arduino-compatible microcontrollers. It provides a simple and user-friendly interface where programmers can write, compile, and upload code, known as sketches, to a microcontroller board. Because of its simplicity, the Arduino IDE is widely used by beginners, hobbyists, students, and professionals in embedded systems development.
An Arduino sketch is primarily composed of two functions: setup() and loop(). The setup() function is executed only once when the microcontroller is powered on or reset, making it ideal for initializing hardware such as input/output pins, serial communication, Wi-Fi connections, and sensors. The loop() function runs continuously after setup() has finished, allowing the microcontroller to repeatedly monitor inputs, process data, and control outputs.
The Arduino IDE also includes tools for verifying (compiling) code, uploading programs to the microcontroller, and debugging applications using the Serial Monitor. Additionally, it supports thousands of libraries that simplify interfacing with sensors, displays, communication modules, and other electronic devices, significantly reducing development time.
One of the strengths of the Arduino IDE is its broad hardware compatibility. Besides official Arduino boards, it supports popular microcontrollers such as the ESP8266 (ESP-12) and ESP32, making it suitable for Internet of Things (IoT) and wireless communication projects.
In this project, the Arduino IDE serves as the primary software development environment for programming the ESP-12 microcontroller, which manages the coin slot, relay control, Wi-Fi communication, and interaction with the MikroTik router. Its ease of use, extensive library support, and rapid development capabilities make it an effective platform for implementing and testing the embedded control system used in the DIY Piso WiFi project.
You do not have permission to view the full content of this post. Log in or register now.
Upon installation we need to have the following.
1. Divers for You do not have permission to view the full content of this post. Log in or register now. this will recognized your ESP board
2. Board Manager
- install board esp8266 shown below
- after installation, choose board
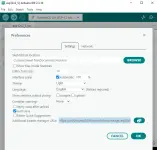
3. Steps on updating board for esp8266
- Open Arduino IDE.
- Go to File → Preferences.
- In Additional Boards Manager URLs, add:
You do not have permission to view the full content of this post. Log in or register now.
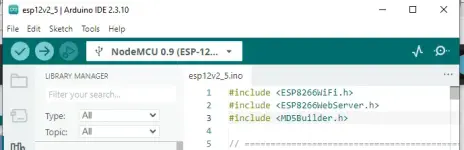
- Libraries - this will give you preprogrammed files to support functions - we need this following 3 libraries
- Using your USB Cable, connect your ESP-12E/8266 to your computer
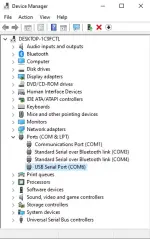
- Your ARDUINO IDE need to identify the port where your USB cable is attached, open your device manager to confirm the port
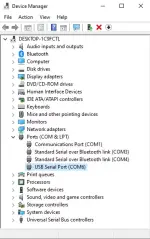
- Select the port indicated on your device manager
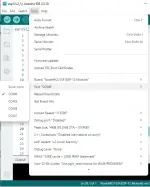
- Please proceed to https://phcorner.org/threads/2566671/#post-31727418 to continue with the coding