 PH
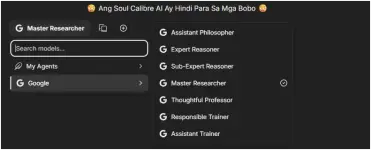
PHLibreChat AI | Powered By Google Gemini Via Vertex AI
What Is LibreChat AI?
-> LibreChat is a free and open-source AI chat platform that allows you to access and manage various AI models from different providers in a single, unified interface. It brings together major AI providers like OpenAI, Anthropic, Google, and others, allowing you to switch between them seamlessly. Meaning, kung meron kayong API from OpenAI, Anthropic, Gemini, etc., pwede nyong ibala sa LibreChat AI.
Use Case?
-> For personal use. Pero pwede nyong i-benta or ipa-rent sa iba. Pwede ring pang-share lang for free.
What You Need
- Credit / Debit Card. Kung may working BIN kayo, mas OK para hindi nyo na i-shoulder ang deposit. Kung wala naman, you can use your own credit or debit card, make sure lang na merong laman at least $10 kasi may deposit nang requirement na naka-depende sa bank. Prepaid Debit Cards are not acceptable sa Google Cloud Console.
- VPN. Kailangan lang ito in case meron kayong gagamiting BIN at hindi owned credit/debit card.
- Own/Custom Domain. Optional lang ito, pero mas prefer ko ito for VM-security purposes.
- Utak. Mahalaga talaga ito. Hindi nyo masusundan ang instructions kung wala kayo nito.
- Go to You do not have permission to view the full content of this post. Log in or register now. and sign up for a free account. May $300 credits yan na valid for 90 days for new sign ups. Again, need ng deposit depende sa bank ng card mo. Sa mga na-try ko na, pinaka-mababa ang BDO credit card. Nasa ₱300 lang yung deposit.
- After nyong mag-sign up, go to You do not have permission to view the full content of this post.
Log in or register now. and create a virtual machine.
- OS: Ubuntu 24.04 LTS
- Core: 2 vCPU; 8GB RAM (up to 50 active users) | 4 vCPU; 16GB RAM (more than 50 active users)
- Storage: At least 250GB Balanced Persistent Disk
- VM External IP Type: Static
- Enable HTTP and HTTPS
- Vertex AI Service Account.
- IAM & Admin → Service Accounts → Create Service Account
- Role: Vertex AI User (aiplatform.user)
- Keys → Add key → Create new key → JSON
- —> Download and rename the file to “auth.json”
- IAM & Admin → Service Accounts → Create Service Account
- Visit Domain Registry and add 'A' record.
- Record Type: A
- Name: @
- Data/Value: VPS IP Address
- TTL: Lowest available TTL
- Depende sa inyo, pwedeng gumamit ng subdomain. Example: gemini.yourdomain.com
- Initial Ubuntu Setup.
- SSH to your VM using 'root', and create another user. Assign elevated permissions to the new user. Pero kung ayaw nyo, pwede namang root user na lang.
- Update the system: apt update && sudo apt upgrade -y
- Install essentials: apt install -y ca-certificates curl gnupg git ufw nano unzip build-essential
- Allow ports 80 and 443: ufw allow 80 && ufw allow 443
- Enable UFW: ufw enable
- Install Docker.
- install -m 0755 -d /etc/apt/keyrings
- curl -fsSL You do not have permission to view the full content of this post. Log in or register now. | sudo gpg --dearmor -o /etc/apt/keyrings/docker.gpg
- chmod a+r /etc/apt/keyrings/docker.gpg
- echo "deb [arch=$(dpkg --print-architecture) signed-by=/etc/apt/keyrings/docker.gpg] You do not have permission to view the full content of this post. Log in or register now. $(. /etc/os-release && echo "$VERSION_CODENAME") stable" | sudo tee /etc/apt/sources.list.d/docker.list > /dev/null
- Update ulit para safe: sudo apt update
- apt install -y docker-ce docker-ce-cli containerd.io docker-buildx-plugin docker-compose-plugin
- systemctl enable docker && systemctl start docker
- If you are using a non-root user, run: usermod -aG docker $USER
- Then: reboot
- Clone LibreChat.
- cd /opt
- sudo git clone You do not have permission to view the full content of this post. Log in or register now.
- Own the directory if you are not using root: sudo chown -R $USER:$USER /opt/LibreChat
- cd /opt/LibreChat
- Create and configure the .env file.
- cp .env.example .env
- echo "UID=$(id -u)" >> .env && echo "GID=$(id -g)" >> .env
- Run 3 times: openssl rand -hex 32
- Run 1 time: openssl rand -hex 16
- Make sure to copy the generated codes.
- vim .env
- DOMAIN_CLIENT=You do not have permission to view the full content of this post. Log in or register now.
- DOMAIN_SERVER=You do not have permission to view the full content of this post. Log in or register now.
- CONFIG_PATH=/app/librechat.yaml
- GOOGLE_SERVICE_KEY_FILE=/app/api/data/auth.json
- GOOGLE_LOC=global
- ENDPOINTS=google
- GOOGLE_MODELS=gemini-3.1-pro-preview,gemini-3.1-pro-preview-customtools,gemini-3.1-flash-lite-preview,gemini-2.5-pro,gemini-2.5-flash,gemini-2.5-flash-lite,gemini-2.0-flash-001,gemini-2.0-flash-lite-001
- —> Depende kung ano ang available na AI models at the time nagagawa kayo, you may need to adjust these model names.
- GOOGLE_CLOUD_LOCATION=global
- # GOOGLE_API_KEY=
- # GEMINI_API_KEY=
- —> Comment out these two kasi hindi kakailanganin. Pampagulo lang yan sa .env.
- JWT_SECRET:
- JWT_REFRESH_SECRET:
- CREDS_KEY:
- CREDS_IV:
- —> Dito nyo ilagay yung mga codes na na-generate (openssl rand -hex 32 & openssl rand -hex 16). Yung openssl rand -hex 16, ilagay nyo sa "CREDS_IV".
- APP_TITLE=Soul Calibre AI
- CUSTOM_FOOTER="© 2026 Soul Calibre AI. All Rights Reserved."
- HELP_AND_FAQ_URL=You do not have permission to view the full content of this post. Log in or register now.
- SHOW_BIRTHDAY_ICON=false
- Prepare LibreChat Writable Folders & Authentication File.
- mkdir -p logs images uploads api/data data-node meili_data_v1.35.1
- Run this if not using root: sudo chown -R $(id -u):$(id -g) logs images uploads api/data data-node meili_data_v1.35.1 && chmod -R u+rwX logs images uploads api/data data-node meili_data_v1.35.1
- vim /api/data/auth.json
- —> Paste the entire contents of the 'auth.json' file na na-download from GCP.
- chmod 600 api/data/auth.json
- Create/Edit Necessary Files.
- nano docker-compose.override.yml
- —> Remove all the contents of the file and paste the code shown below.
- vim docker-compose.yml
- Change From: - "${PORT}:${PORT}"
- Change To: - "127.0.0.1:${PORT}:${PORT}"
- nano docker-compose.override.yml
- Start LibreChat.
- docker compose pull && docker compose up -d
- Install & Configure Caddy.
- apt install -y debian-keyring debian-archive-keyring apt-transport-https curl
- curl -1sLf 'You do not have permission to view the full content of this post. Log in or register now.' | sudo gpg --dearmor -o /usr/share/keyrings/caddy-stable-archive-keyring.gpg
- curl -1sLf 'You do not have permission to view the full content of this post. Log in or register now.' | sudo tee /etc/apt/sources.list.d/caddy-stable.list
- apt update && apt install -y caddy
- vim /etc/caddy/Caddyfile
- —> Paste the code shown below.
- Save the file and make sure to validate para ma-check kung tama ang configuration: caddy validate --config /etc/caddy/Caddyfile
- Kung tama naman, reload and enable: systemctl reload caddy && systemctl enable caddy
- Test, Share, & Enjoy
- Visit: You do not have permission to view the full content of this post.
Log in or register now.
- Register an account. The first account to be registered will automatically become the ADMIN.
- Visit: You do not have permission to view the full content of this post.
Log in or register now.
QUICK TIP
For a more personalized AI model configurations, aralin nyo yung configuration ng "librechat.yaml". May sample naman sa official repository. Read You do not have permission to view the full content of this post. Log in or register now. para sa detalye.
Ginawa ko ang tutorial na ito para magka-idea yung mga salahula diyan, para maisip (in case kaya nilang i-perceive) na hindi simpleng one-click button ang pag-deploy ng LibreChat. Para sana, hopefully, maisip nilang makapal ang mukha nila dahil yung mga simpleng rules and instructions lang ay hindi pa nila magawa. Yung iba pa diyan, makahinge ng API key na akala mo naman nadadampot lang yan sa tabi-tabi. Eeh kung gumawa ka ng GCP account para ma-activate ang $300 credits, edi may API key ka na rin sana. Hindi yung sa hinge hinge na lang aasa. Abah, mahiya naman kayo.


YAML:
# docker-compose.override.yml
services:
  api:
    volumes:
      - ./.env:/app/.env
      - ./librechat.yaml:/app/librechat.yaml   # Only add this line if you plan to use librechat.yaml configuration.
      - ./images:/app/client/public/images
      - ./uploads:/app/uploads
      - ./logs:/app/logs
      - type: bind
        source: ./api/data/auth.json
        target: /app/api/data/auth.json

  mongodb:
    ports:
      - "127.0.0.1:27017:27017"
HTML:
# /etc/caddy/Caddyfile
yourdomain.com {
    reverse_proxy 127.0.0.1:3080
}
How much do you love my premium account contents such as this one? I just got my business verified on Google Maps! Leave a positive review by telling the whole world how much you love and enjoy the things I share. Kindly click this link: You do not have permission to view the full content of this post. Log in or register now.. You may also click my signature banner under this thread. Thanks!