 PH
PHCrypto Maniac
Eternal Poster
What is Kali Linux?
Kali Linux is a Debian-based Linux distribution aimed at advanced Penetration Testing and Security Auditing. Kali contains several hundred tools which are geared towards various information security tasks, such as Penetration Testing, Security research, Computer Forensics and Reverse Engineering.
What is Kali Linux Live Bootable Persistence USB?
Kali Linux “Live” has two options in the default boot menu which enable persistence — the preservation of data on the “Kali Live” USB drive — across reboots of “Kali Live”. ... The persistent data is stored in its own partition on the USB drive, which can also be optionally LUKS-encrypted.
Advantages:
- It’s non-destructive — it makes no changes to the host system’s hard drive or installed OS, and to go back to normal operations, you simply remove the “Kali Live” USB drive and restart the system.
- It’s portable — you can carry Kali Linux in your pocket and have it running in minutes on an available system
- It’s customizable — you can You do not have permission to view the full content of this post. Log in or register now. and put it onto a USB drive using the same procedures
- It’s potentially persistent — with a bit of extra effort, you can configure your Kali Linux “live” USB drive to have You do not have permission to view the full content of this post. Log in or register now., so the data you collect is saved across reboots
Requirements For This Proccess:
1. Flash Drive Minimun of 8GB ( Mas Malaking USB Mas Malaki Ang Makukuha Nyo Na Storage )
2. Rufus (You do not have permission to view the full content of this post. Log in or register now.)
3. Kali Linux Live USB ISO File (You do not have permission to view the full content of this post. Log in or register now.) UNG MAY NAKALAGAY NA (LIVE) ANG KUNIN NYO
Steps
1. Flash niyo muna ung ISO File na Dinownload niyo sa USB/Flash Drive.
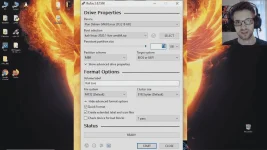
Sagad niyo ung Persistent Partition Size dahil ayan ang magiging storage ng Linux niyo.
Gayahin niyo lang ung Format na yan then click start.
2. Restart niyo Laptop/PC niyo pagtapos na Mag-Flash si Rufus at Pumunta sa Boot Menu by Pressing F12 pag nakita nyo na Logo ng Laptop/PC niyo.
3. Select niyo ung USB na ginamit niyo sa Boot Menu then Select "Live System (Persistence, Check Kali.org/Prst)"
Congratulation!! Meron ka ng Kali Linux
Kung may tanong Comment lang kayo pede ko rin kayo turuan pano mag häçk etc.
Comment lang kung gusto niyo ng Tutorial pano i-setup Kali Linux Niyo

