 PH
PHIn this post I explain how you can fix a motherboard with failed NVIDIA graphics chip. This repair might apply to some HP/Compaq laptops and probably some other brands. If this repair works for you, please mention the brand and model number in comments after the post. This will help other readers.
2. Laptop turns on but there is no video on the screen or external monitor.
Basically, I’m going to heat up the graphics chip with a heat gun to solder it back to the motherboard (reflow). I think this method is more reliable and the repair should last for a while.
Proceed at your own risk and don’t blame me if after this repair you’ll get a very expensive door stop.
If you don’t feel comfortable doing this repair, take your laptop to the repair shop.
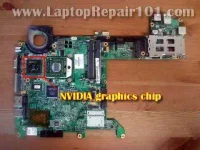
In my example I’m using a motherboard removed from HP Pavilion tx2000.
In most laptops the graphics chip located under the CPU heatsink (and it has NVIDIA logo on it), so there shouldn’t be a problem locating the chip.
To protect the motherboard from the heat I used a regular cooking aluminum foil. I cut off a piece of aluminum foil and folded it a few times to make my protection shield thicker. After that I cut off a square opening right in the middle, same size as the NVIDIA chip.
If there is thermal grease on the chip it has to be removed. You can remove thermal grease using ******* swabs.
It’s not necessary to make it perfectly clean. Just make sure there are no large chunks of the grease on the chip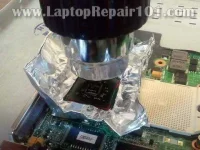
UPDATE: Some people mentioned that I should have applied some liquid flux underneath the chip for better results. I’ll definitely do it next time when I have to fix another motherboard.
I found You do not have permission to view the full content of this post. Log in or register now. explaining how to apply liquid flux under the chip. This video was made for Xbox 360 motherboard but should apply to any laptop motherboard too.
Finally, I positioned the heat gun above the NVIDIA chip about 1 inch away and turned the heat gun into the position 1
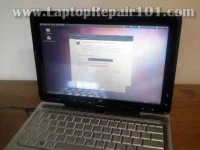
After 50 seconds I turned it off and let the motherboard cool down for about 20 minutes.
Don’t forget to apply new thermal grease on the graphics chip when you install the heat sink.
Some laptops use thermal pads instead of grease. If that’s the case with your laptop, make sure the thermal pad positioned correctly.
After I assembled the laptop back together, the video started properly!
The NVIDIA graphics chip problem fixed!
Will it last for a long time? I don’t know. Still testing.
1. Laptop turns on with garbled video on the internal screen and external monitor.MOST COMMON PROBLEM SYMPTOMS
2. Laptop turns on but there is no video on the screen or external monitor.
The graphics chip soldered to the motherboard. When the laptop runs hot for a long time, the graphics chip separates from the motherboard and video fails.MY UNDERSTANDING OF THE PROBLEM
Before I tried You do not have permission to view the full content of this post. Log in or register now. in an oven or You do not have permission to view the full content of this post. Log in or register now.. But today I’m going to fix it using a heat gun/hot air.HOW TO FIX FAILED CHIP
Basically, I’m going to heat up the graphics chip with a heat gun to solder it back to the motherboard (reflow). I think this method is more reliable and the repair should last for a while.
There is no guaranty this method works all the time. While doing this repair you may damage the motherboard and make it unrepairable.WARNING!
Proceed at your own risk and don’t blame me if after this repair you’ll get a very expensive door stop.
If you don’t feel comfortable doing this repair, take your laptop to the repair shop.
First of all, you’ll have to disassemble the laptop and remove the motherboard.HOW I FIXED THE MOTHERBOARD
In my example I’m using a motherboard removed from HP Pavilion tx2000.
In most laptops the graphics chip located under the CPU heatsink (and it has NVIDIA logo on it), so there shouldn’t be a problem locating the chip.
To protect the motherboard from the heat I used a regular cooking aluminum foil. I cut off a piece of aluminum foil and folded it a few times to make my protection shield thicker. After that I cut off a square opening right in the middle, same size as the NVIDIA chip.
If there is thermal grease on the chip it has to be removed. You can remove thermal grease using ******* swabs.
It’s not necessary to make it perfectly clean. Just make sure there are no large chunks of the grease on the chip
UPDATE: Some people mentioned that I should have applied some liquid flux underneath the chip for better results. I’ll definitely do it next time when I have to fix another motherboard.
I found You do not have permission to view the full content of this post. Log in or register now. explaining how to apply liquid flux under the chip. This video was made for Xbox 360 motherboard but should apply to any laptop motherboard too.
Finally, I positioned the heat gun above the NVIDIA chip about 1 inch away and turned the heat gun into the position 1
After 50 seconds I turned it off and let the motherboard cool down for about 20 minutes.
Don’t forget to apply new thermal grease on the graphics chip when you install the heat sink.
Some laptops use thermal pads instead of grease. If that’s the case with your laptop, make sure the thermal pad positioned correctly.
After I assembled the laptop back together, the video started properly!
The NVIDIA graphics chip problem fixed!
Will it last for a long time? I don’t know. Still testing.