🔒 Closed The ultimate guide to windows

Status
Not open for further replies.

Strawberrry

Forum Veteran
bLae7sX.webp
Want a faster Computer? Look no more!

Defrag
Guide
Warning, do not defrag a SSD. The drives, the method of storing is different when it comes to HDD, and defragging a SSD will (over time) make it slower.
oGrALCu.webp

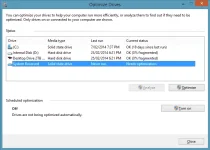
  1. Open the start menu and search for ‘Disk Defragmenter’ (windows 8 it’s called Defragment and Optimize Drives). Open it.
  2. Find the drive that you want to Defrag and click ‘Analyze’
  3. Once done, click ‘Defragment’. The process can take several hours depending on fragmentation and disk size.
  4. For windows 8, once again click ‘Analyse’, if the fragmentation is over 10%, click ‘optimize’

CCleaner
Guide
You do not have permission to view the full content of this post. Log in or register now.

CCleaner is an amazing program that performs many actions, that removes junk, and helps to speed up your computer. It is one of the most popular 'all in one' tools out there, and is the first choice of many in regards to cleaning and optimizing your machine. Some of the features are;
  • Cleans temp and unneeded files from a whole range of programs
  • Cleans your registry
  • Uninstalls programs
  • Removes programs from startup

The application itself is very easy to use, and if you're not sure of an option, the site itself provides amazing documentation on all of it's features. Just be weary of the 'Advanced' options in the cleaner (gives you warnings when you select them), and whilst cleaning your registry ALWAYS backup!

Disk CleanUp
Guide
tBBn3m2.webp

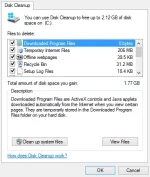
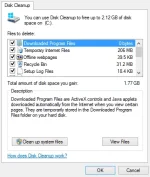
Disk clean up is an amazing utility pre-loaded on most windows computers. It does not provide as much detail as CCleaner, but if you don't want to download anything, it certainly does the job! You can access Disk Cleanup by either searching for it in the start menu or locating it under Administrative Tools -> Disk Cleanup

When started, it will ask you which drive you wish to clean (most of time you'd select C: ), and from there you’ll be presented with a few options;
  • Either select which checkboxes you wish to clean, if you’re not sure, either leave it blank or look it up, and press okay. Wait for it to do it’s magic.
  • Or if you know what you’re doing, you can press ‘Clean up System Files’ and once again, it will ask which disk you wish to check, scan the disk for files to remove and you’ll be presented with a window like above. Once again, do not clean files you are unsure about. When selected the options you like, press okay and wait for it to finish.

Uninstall your Applications
Guide
Although this option may seem explanatory and stupid to list, you would not believe how many people leave programs that they’ll never need on their computer. Once of the first things many people do on a routine basis, is go through the programs that they’ve installed, and removing ones that are needed. Many unneeded programs create their own startup entries, which can greatly increase the time taken to login. This can be accessed by either searching for ‘Programs and Features’ or opening Control panel and navigating to ‘Uninstall a program’ in the category view, or ‘Programs and Features’ in the icon view.

Programs on Startup
Guide
There are many ways to increasing the speed of your login, and by far, (unless you buy a SSD) the fastest method is to remove unneeded programs in your startup. Here are three methods in removing programs from startup;

Using Windows System Configuration

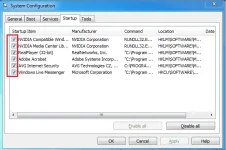
  1. Open run (win+r) and type ‘msconfig’, press enter
  2. On versions of windows below 8, navitate to the ‘startup tab’
    startup-programs.webp
    (This was taken from Microsoft's Technet as I do not have Windows 7 Installed)
  3. From there, you can disable programs that are in your startup
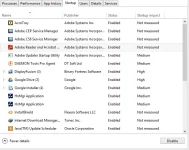
  4. On windows 8 and above, nagivate to your task manager (right click on taskbar, and click ‘Task Manager’
    O8wjR4Z.webp
  5. From there, go to the ‘Startup’ tab, and in the same was as windows 7, you will be able to download programs from startup
Using CCleaner

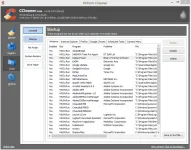
This is the same method as above, but uses CCleaner as explained in the ‘CCleaner’ section. All you need to do is select a program, you can either disable, enable, or different to the System Configuration above, you can delete it completely from the start up entries.
exQOIdW.webp

Using Quick Startup (recommended)
You do not have permission to view the full content of this post. Log in or register now.
4DZ4Mvw.webp

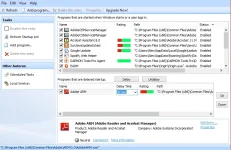
This is the program that I use to manage my startup, no tutorial is needed, as it is very easy to use. As you can see from the Image above, you are able to disable (like both above) and delete (like CCleaner), but you get an added feature. This time you are able to delay an application. This is very useful if you wish an application to run on startup, but you do not require it straight away. To do this, simple highlight an application and select Delay. As seen from the image above, you can select how many seconds you wish the application to delay to. You may also add entries to the list, so that when your login, your favourite programs will start.

Why is my disk full?
Guide
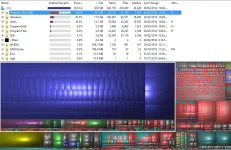
Running CCleaner, Disk Cleanup and Defrag might make a bit of room on your HDD, but they can only search for a specific set of files. Sometimes you might have locked a file away on your computer, where it be a video, a folder of old files or even compressed files. The best way to do that is to get a program to analyse your disk(s). The best tool for this job is WinDirStat.

You do not have permission to view the full content of this post. Log in or register now.

Simply download the application, install it, once run select a disk to analyse and let the program do it’s magic. Once done, you can tell what directories are taking up so much space, and what file are.
C9UIQe1.webp

If you are after a more light weight program (that is also portable) then SpaceSniffer is an amazing alternative;

You do not have permission to view the full content of this post. Log in or register now.

Note: If you find that Pagefile.sys and Hyberfile.sys are taking so much room, look at Post #3 for a guide on what they are and how to remove them!

Update Drivers
Guide
All the time hardware drivers are being updated. Most of the time, the updates are there to make the device run smoother on your system. In many cases, slow machines can be easily boosted by making sure that the drivers are updated. There are many programs to do this for you, but I find that the best method is to always do it manually.

You can find out what drivers you need in three ways;

Go through Device Manager
tBBn3m2.webp

  1. Go to Device Manager (Right click on my computer -> Properties -> Device manager)
  2. Find the tab corresponding to your tab (display adapters = video cards etc…)
  3. Look at the name of the device, and with your system version and architecture (ie W7 x64) search and download the drivers online

Download Speccy
Download Speccy (You do not have permission to view the full content of this post. Log in or register now.)

  1. Find the device you which to update
  2. Look at the name of the device, and with your system version and architecture (ie W7 x64) search and download the drivers online

If you have an unknown device (will show as ‘Other Devices’ in the device mananger, with a yellow exclamation mark) please follow Auras amazing tutorial on it here. No need for me to write it out myself

Clean your Registry
Guide
This is an iffy topic when it comes to cleaning and optimizing your computer. Some believe that it does more bad than good, and dealing with the registry at all can cause problems if your inexperienced, occasionally problems you can’t fix. Before doing a registry clean, make sure you do a system restore. This is critical.

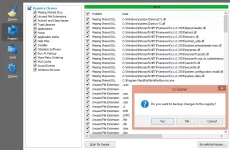
CCleaner. Once again I will reference this magic program. This is what I use to clean the registry with, and do it once a month or so.
3KCCOv9.webp

To fix rix your registry, simply open the application, click on the registry tab, click ‘Scan for Issues’, and once they have been found click ‘Fix selected issues…’. Once again, make sure you say YES to backing up. This may come in handy.

Another popular program is called Registry Repair, once again by GlarySoft (who also made Quick Startup above).
You do not have permission to view the full content of this post. Log in or register now.

Speed up your Internet
Guide
Speeding up your internet is been something that so many people have tried to do, and most have failed. Many applications offer ‘turbo download’ by splitting files into various parts and downloading each individually. You can research that one yourself (such as IDM). What I am going to talk about in this though is a program called NameBench.

You do not have permission to view the full content of this post. Log in or register now.

What DNS servers do is resolve a name (example, google.com) and will convert it to it’s IP address (x.x.x.x). The better the DNS server, the faster it can resolve the name, and the faster you will load a webpage. In terms of download speed, however, it will only help at the start of the download (will pick up download address faster) but will plateau at your speed cap.

To find out which is the best for you, follow this;

  1. Download Name bench (link above), run it and it will extract to a location and run iteself
  2. The default should be fine, all you need to do is click ‘start’
  3. This process can take a long time to run, so be patient. Really, patient.
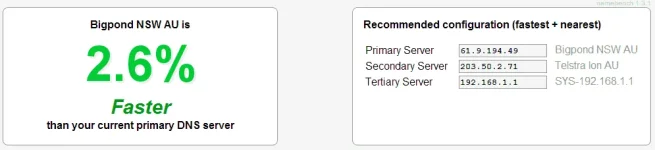
  4. Once finished your results will look like this;
    U84NrjF.webp

  5. From there it will tell you what DNS you should use (leave the program running, or copy the fastest 2 [the last one is seldom used])

Using this DNS
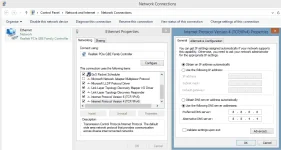
  1. Right click on your network icon on the taskbar (usually next to the volume) and click ‘Open network and sharing center’
  2. Click ‘Change Adapter settings’ and right click on whichever you use (wireless or LAN) and click properties
  3. Scroll down to ‘Internet Protocol Version 4 (TCP/IPv4) and click ‘Properties’
  4. Check ‘Use the following DNS server addresses:’ (if not checked already)
    iPCxaxu.webp

  5. Making sure you have the DNS’s written done (or open) from the Namebench test, copy and paste them in the fields you see there (Primary in the Preferred, Secondary in the Alternate)
  6. Click ok to both windows, and exit the Networking and Sharing Center

Flushing your DNS
  1. This last part not many people do, but it doesn’t hurt
  2. Open CMD and type this;
    Code:
    ipconfig /flushdns
  3. Then press enter
  4. You can also change the DNS in your router at this point if you wish (same IP’s based off the NameBench), each router has their own way of doing that, so best look up your make on google and find out yourself.

Scan for viruses

As with uninstalling unneeded programs, this can also seem a bit silly to include. But many people don’t realise that if your PC is infected, that virus is going to constantly run processes in the background, and if the virus is a key logger or a RAT, then it could take up a lot of bandwidth on your system too. This point speaks for itself, and so I will not go into too much detail, but here are some applications that do the job well.

Kaspersky – You are required to buy this, but if you have the money, it is definitely worth it
You do not have permission to view the full content of this post. Log in or register now.

Malaware Bytes
Download Link

Ad-aware
You do not have permission to view the full content of this post. Log in or register now.

Bit Defender
You do not have permission to view the full content of this post. Log in or register now.

These are just a guideline, every person has their own personal preference.



VC0LY2u.webp
Guides to help you with solving (and fixing) errors

Blue Screen
Guide
Windows 8 Blue Screen
800px-BSoD_in_Windows_8.png


Windows 7/Vista/XP Blue Screen
Windows_XP_BSOD.webp

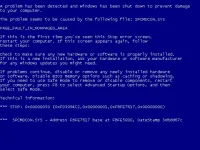
Blue Screens are one of the most common errors that people think of when a system crashes. The screen will appear if an error causes windows to cease operating, and either shut down or reboot. The BSOD error houses two important information (windows 8 has only one of those);

The first of which is at the top of the error;

iAqUtPM.webp

Is known to most as a bug check. This will state the problem that has caused the error, most times listing a file that caused the problem. When fixing a BSOD error, this is the first thing you’ll use.

The second part of information;

Kl5b4Hu.webp

Houses what is called the STOP code. The first part of the information is called the Bugcheck code (what is written above, but with numbers/letters). The second part of this section, which is the stuff that is in brackets, are the paramaters. When browsing for support on the issue, you might come across a Microsoft page with the code listed in a table. In this table it will list paramaters and the error behind each parameter. Each set of code in the bracket is a parameter (parameter 1, 2, 3 etc..). Without this piece of information, it is very hard to fix an error.

So how do I fix it
There is not one method to fix a blue screen. As the blue screen itself only provides a means to determine what has caused the error in the first place. If you missed the error code, or never bothered to write it down, then there is a nifty program called BluescreenView to help you;

You do not have permission to view the full content of this post. Log in or register now.

This program scans the minidump, to where windows will log the error, and display it in a table. It will also show you the files involved within the error, and list the results for easy fixing. You can also view the Blue screen itself if it makes it easier.

Now once you have found the bug check, files involved and the parameters to the bug check, you can start fixing. But as there are thousands of errors, there are also thousands of problems.

About.com has a really nice list with all of the codes listed. You do not have permission to view the full content of this post. Log in or register now..

You have two options to fix your problem, you can either google your BugCheck code, from there (using the paramaters) pinpoint the problem and google it to find the fix. If that doesn’t work for you, or you are unsure as to how to fix the problem, you’re more than welcome to make a thread in this section, and someone will help you out!


Memtest
Guide
If you are receiving BSOD errors relating to your Memory such as 0x1A, then you might have problems with your RAM. Bad RAM can also cause intermittent freezes (as short as a millisecond, as long as 10 seconds) inside Windows. Running Memtest helps!

To run Memtest, you require one of two things. Either a CD or USB. I recommend the USB method!

  1. First of all, you must download Memtest; You do not have permission to view the full content of this post. Log in or register now.
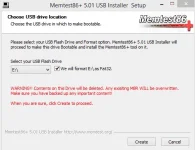
  2. Once done, you have two options. If you chose to download the installed (option listed as Download – Auto Installer for USB Key…), download it, extract it, then run it

    8QDWVaZ.webp

  3. You will be presented with an image above. I recommend formatting the USB as well, making sure you backup whatever is on there first. One done, click create. It will do everything itself.
  4. If you chose to use a CD, simply download the ISO (I recommend the .zip option), once downloaded burn the ISO to a CD/DVD with whichever program you prefer
  5. Restart your computer, and launch the boot menu (different for each motherboard). One there select USB if you put it on the USB, or CD if you put it on a CD
  6. The application will immediately start running as soon as you boot into it, so don’t touch anything!
  7. Most people recommend that you leave it until at least 7 passes!
  8. This can take hours depending on your RAM and computer
  9. If you get the all clear do not proceed further, if you fail the test (will show as red) then you must follow the next set of steps

So I did not pass the test….

  1. The next part is diagnosing which RAM stick you have errors with. If you do not feel comfortable with doing so, either look up a tutorial or get someone you know to do it for you.
  2. First you need to test Slot #1 and Stick #1. If you only have 1 stick of ram, continue to steps 4 and 5
  3. Disconnect the other RAM, keeping them separate. Following the above guide, run the test again
  4. If you get the all clear, the test it in the next slot, and keep doing so until it fails (or passes). If Stick #1 passes the test on all spots your RAM was occupying before, then you know that the slots are fine, and that it is one of the other sticks of RAM that is problematic. Go to step 6
  5. If the test for only one stick of RAM fails on all slots, then it means that either your need more ram (likely) or all slots in the motherboard are faulty (unlikely)
  6. Get your next stick of RAM. If it fails on the first slot (to which you tested on step 4 that slot #1 is fine) then it means that that stick of RAM is faulty. To be sure, you can test it on the next slot
  7. If you have no more RAM, then you have no more testing. If the slots are faulty, then you need a new motherboard. If the sticks are faulty, then you need more RAM.
  8. If you have more RAM to test, continue to do so. If they fail on slots that once again have passed with good ram, then you know the ram is problematic. As above, you need to replace it.

It is also important to note that if your motherboard is a dual channel system, then you require 2 or more sticks of ram for it to function properly. So if you only had two sticks before, and one is faulty, then it is best to get another stick of the SAME RAM.

CHKDSK Tool
Guide
Windows has an embedded tool called Check Disk which you can run through the CMD to help fix your HDD.
The complete syntax for this command is;
Code:
CHKDSK [volume[[path]filename]] [/F] [/V] [/R] [/X] [/I] [/C] [/L[:size]]
To find the volume number, follow the disk part guide above. If you do not enter a volume number, windows will automatically check C:.

What each command does (in order of paramaters)
  • Volume - Sets which volume to use
  • [path]filename – Checks a file for integrity, but only on FAT drivers. An example for this would be;
    Code:
    C:\Users\Infinite\filethatiwanttocheck.png
  • F - Finds and fixes any errors on a disk
  • V(FAT) – Lists the paths and files on the disk
  • V(NTFS) – Will display cleanup messages, when used with /f and /r
  • R – Repairs and fixes bad sectors on the drive
  • X – Forces to volume to unmount in the case that /f and /r can’t clean a mounted driver
  • I – Checks indexing entries on NTFS only drives
  • C – Only again NTFS only, skips checking cycles within the folder structure

You will mainly use only two of those parameters, /f and /r.

To check for, and repair, errors and sector issues on C: type in to CMD;
Code:
CHKDSK /r /f

For any other device, you need to use the letter followed by a colon;
Code:
CHKDSK D: /r /f

For drivers without a letter, you must use give it a letter. You do that through the disk management;

  1. Open run (win+r)
  2. Type ‘diskmgmt.msc’ and press enter
  3. Right click on the driver and select ‘Change Driver letter and Paths’
  4. Select the drive you wish to change and click ‘Change’
  5. From there you can assign the drive a letter, click ok
  6. Go back to CHKDSK and use that letter for the [volume] tag

To check any erros on a drive, that drive must be locked. And to do so, would usually require checking the disk upon next restart (will give you an option, to which you press ‘y’). It is also good to note that most people just use /r (as it implies /f) but as common practice, /r and /f together do not impose any harm in the system, and is recommended that you use both.


Repair system files
Guide
When receiving errors that you’re not sure about, or errors that you can’t seem to fix, then repairing your system files is a very simply diagnosis tool to fixing some problems. Running it doesn’t do any harm at all, so if you feel as though you need to use it, then do so.

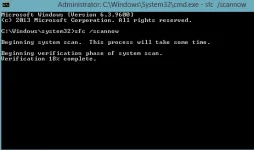
We will be using a line in the CMD called SFC ‘System File Checker’.
Code:
sfc /scannow

What this does, is scan your system files for any errors, missing files or corruption. When found, it will then replace the bad file with a copy that is kept in an compressed archive within your system32 (system32/dllcache).

Sklthsq.webp

  1. To run, open an elevated CMD, and run the code above
  2. This will then do its stuff automatically.
  3. When finished it will give you one of either of these messages below
Code:
Windows Resource Protection did not find any integrity violations
  1. Your system is fine, no need to do anything else
Code:
Windows Resource Protection could not perform the requested operation
  1. For whatever reason, the process could not run
  2. First, try and run it in safe mode, if it doesn’t fix, continue;
  3. Still in safe mode, Navigate to %WinDir%\WinSxS\Temp. From there name sure the folders PendingDeletes and PendingRenames are there, if not, create them and run the test again.
  4. If you still can’t run it, navigate to ‘%WinDir%\Logs\CBS\CBS.log’. This will tell you the reason why it cannot run the scan. Check online for any solutions to the errors listed, or post a thread in this section and we’ll try and help you
Code:
Windows Resource Protection found corrupt files and successfully repaired them. Details are included in the CBS.Log %WinDir%\Logs\CBS\CBS.log
  1. This is what you want to see (sort of)
  2. The message indicates that there WERE problems, but they have been found, and are now fixed. You can view the CBS.log to see the problematic files
Code:
Windows Resource Protection found corrupt files but was unable to fix some of them. Details are included in the CBS.Log %WinDir%\Logs\CBS\CBS.log
  1. This is a bit easier than the second method to fix. First of all navigate to the log in the message above
  2. From there, you will need to find the files that it could not fix. Once done, you must now replace that file yourself.
  3. You must now take ownership of the file, you can do this in many different ways, my personal favourite is to add a ‘Take Ownership’ option in the right click menu, by following You do not have permission to view the full content of this post. Log in or register now.
  4. From there, you can copy a known good file (can download) online of the corrupt file(s) and use this command;
    Code:
    copy goodfile badfile
    Where ‘goodfile’ is the location of the good file and badfile is the location of the corrupt one you found earlier
  • Then simply restart, and perform another test if you wish to test for any more errors (or if you did the last step correctly)
RXi6LSv.webp
Can’t fix it? Just abandon ship!

System Restore
Guide
System restore is in place in case you accidentally changed some system files that you weren’t meant to, and so have created errors or performance issues. This is also a viable tool in the case that a windows update goes bad and you need to revert the update.

There are a few ways to initiate System Recover;

  1. Open run (win+R) and type rstrui.exe, then enter
  2. Go to advanced system settings, system protection, then System Restore
  3. On windows 8, go to PC settings, Update and Recovery, and click ‘Advanced Startup’
  4. From the windows boot menu (traditionally pressing F8 right after the BIOS spashscreen) and navigating to the System Restore tab
  5. From inserting the Windows Vista/7/8 disk, going to repair, and selecting System Restore

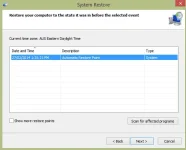
Once open, navigate to this window here;

QR8zoxM.webp

Select your restore point and continue with the restore.

Windows will create restore points before updating.

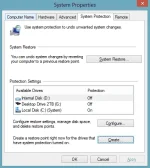
You can also create one by navigating to the advanced system settings, and by pressing the ‘create’ button in the System protection tab;

fQhy4l7.webp


Refreshing and Resetting (windows 8/8.1 only)
Guide
This is a feature that is only available to people with windows 8/8.1 and is used as a last resort, in the case that you cannot fix the problem that you are facing. To get to these options;

  1. Navigate to PC settings
  2. Go to the Update and Recovery tab (at the bottom)
  3. Go to the ‘Recovery’ option
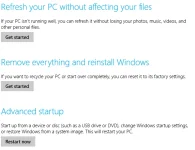
  4. You are then faced with these 3 options

SNINT6i.webp

Refresh
This option will effectively reset your computer, but you won’t lose any files or settings. Upon going through this option, all your programs are uninstalled, but a list will be created of all those programs, and upon starting the computer after the refresh, a text document will be on the desktop. This is the best option for those without any media to back up their files to, who also do not wish to lose any of their settings.

Reset
This option is done if the refresh still isn’t working. This is effectively the same as putting in a windows install disk, and installing windows again. Unlike the refresh, you will not get a list of uninstalled programs and all of your data will be removed. This is a good option for people who are selling their computer, who do not have a disk (OEM machine), and want the next owner to have a fresh windows install.

Advanced startup
The last option resets your computer and opens the Advanced Statup. This allows you to boot from a USB/CD or repair your PC with the troubleshoot options. This is only used if you cannot boot into windows, and can also be accessed by pressing F8 before windows boots.
 
HBER2Ut.webp
Anything not that is not covered by the above two, but is still useful

Diskpart
Guide

Using Disk to Find volume/disk numbers, clean a disk and Convert between MBR and GPT

Diskpart can be opened by typing ‘Diskpart’ in the CMD. It also can be opened by typing Diskpart in run (Win+R)
Diskpart is very useful in cleaning, converting and formatting disks. As well as determining the disk/volume number for other applications.
To find the Volume Number, follow this;
  1. Open CMD
  2. Type ‘Diskpart’
  3. This will open a new command window starting with DISKPART>
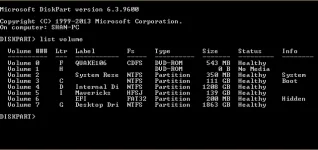
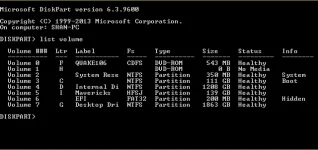
  4. Type ‘list volume’
    EKZXBqb.webp
  5. From the image above, if I was to see the volume for my D:, I would look under the ‘ltr’ tab, and find the number that corresponds with the letter. This case, for my D Drive, the number is 4.

The same thing goes for finding the disk number, except you type ‘List Disk’ instead of List volume, like the example below;

Also noting that if a disk has an Asterisk at the end (in the GPT table) it means that the disk is GUID Partition Table, useful for installing a häçkintosh. Windows traditionally will install windows on MBR. If there is not asterisk (*) your disk is MBR)

Converting a disk to MBR or GPT (This will ERASE THE ENTIRE DISK)

Once diskpart is opened (see above) you need to find the disk number. This can be done also by using the tutorial above.

  1. Type ‘Select Disk x’ where x is the disk you found above
  2. Type ‘Clean’ [this erases all volumes from the disk]
  3. To convert to MBR type ‘convert mbr’
  4. To convert to GPT type ‘convert gpt’

More information on DISKPART can be followed from You do not have permission to view the full content of this post. Log in or register now..


Why are Pagefile.sys and Hyberfile.sys taking all my space!

Guide
Pagefile

So let’s say, like me, you have a SSD and a HDD running together. Like many people do, you place windows and your most used programs on your SSD (for faster loading) and everything else on your HDD (which is much cheaper than a SSD). But all of a sudden, your SSD starts to run out of memory, and out of nowhere you notice this massive file which in some cases can be over 12GB in size, the pagefile.sys.

What does it do?

When you open a program, windows will move the files from the program to the RAM. This is because RAM can access a file much (much) faster than a hard drive can. When the RAM is getting rather full, windows will create a page file (a backup if you like) which will swap unused applications from the RAM into the pagefile.

Should I remove it?

This is a common myth with computer optimisation (as I spoke of above), as many people believe that removing the pagefile increases the system performance. They are wrong. In fact, not only are they wrong, but removing it completely can cause errors. If your system is using too much RAM, instead of moving unused applications into the pagefile to free up space, the applications will begin crashing as windows can’t process them properly. Many people who remove it completely, will have problems opening applications that require large amounts of RAM (VM’s, Java based applications, heavy games), and don’t know why it keeps happening. The solution, move it to another driver;
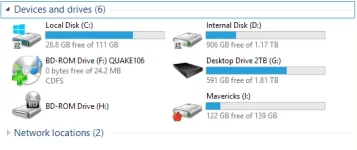
  1. Open Advanced system settings (right click my computer -> Properties -> Advanced system settings)
  2. Go to the ‘Advanced Tab’ and click settings under performance
  3. Once again, go to the ‘Advanced Tab’ and click ‘Change’ Under Virtual Memory
  4. Untick ‘Automatically manage…’
  5. With C: selected, select ‘No Paging file’ and click set. Windows will give you a warning
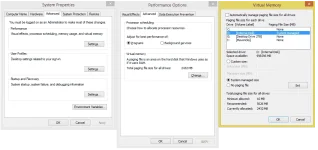
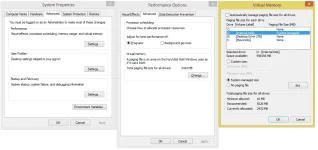
  6. Select your second HDD (for me it’s the D: ), and select ‘System Managed Size’ (if you are unsure, see the image below)

    XYvK2rB.webp

  7. Click Okay in all 3 windows and restart your computer. You should see the pagefile.sys (usually hidden completely, located in C:\pagefile.sys, is now gone

Hyberfile

This one is much easier than the Pagefile, and less controversial. Every time you hibernate your computer, in order for it to resume exactly how it was, windows must make a ‘snapshot’ of your system and then reload that once your computer is turned back on. Depending on the size of your computer, the file can be massive, and does not go away unless you do something about it. If you’re on a desktop computer like myself, and hibernate your computer once in a full moon, your best option is to follow the guide below. If you hibernate quite often, then unfortunately you will have to live with a large file on your HDD.


  1. This is much easier than the Pagefile. Much, easier.
  2. Open an elevated CMD and type;
    Code:
    powercfg.exe –h off
  • To test if it is off, go to the power options next to shut down in the start menu. If you cannot see the hibernate button, then you’re done. Windows will automatically delete the hyberfile.sys file.
  • To turn it back on again, type
    Code:
    powercfg –h on
Always open the CMD as Administrator

Guide
This is for more of the advanced users, as it involved editing the registry. It is one of the most helpful things I’ve ever done, as the amount of times I have to open the CMD, and just right clicking and selecting ‘Run as Administrator’ can be a real pain. Follow this, and you’ll be fine!

  1. Open Registry editor (Run -> ‘regedit’ -> enter)
  2. Navigate to the following key;
    Code:
    HKEY_CURRENT_USER\Software\Microsoft\Windows NT\CurrentVersion\AppCompatFlags\Layers
    If you do not know how to navigate, just double click on each folder icon
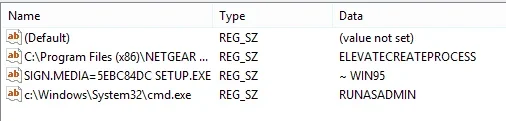
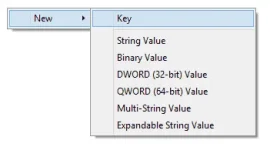
  • One there, right click, and select ‘New -> String’ (you right click in the empty space, not on the folder)

    7V5i0OE.webp
  • And type;
    Code:
    C:\Windows\System32\cmd.exe

    As the string name. NOTE, if your windows is installed on a drive other than c:, then put that letter!
  • Then right click on the string, and for the value type ‘RUNASADMIN’ (without quotation marks)
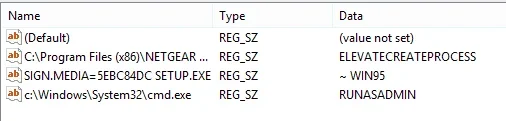
  • When you press ok, it should look like this;

    7NQaPeT.webp
  • Exit out of Registry edit, and you’re done!

Formatting a drive to a format unavailable
Guide
Occasionally you might come across a drive that you won’t be change it to a specific format. Certain USB’s or devices will be formatted under the exFAT format, and can sometimes not be changed to a more common one (FAT32 or NTFS). The easiest way to do this would be to use CMD, but I prefer to use Diskpart, as it is more reliable;


  1. First open CMD and type ‘Diskpart’
  2. Type ‘List volume’
  3. Then type ‘select volume x’ where x is the volume you wish to format
  4. The type the command;

    Code:
    format fs=CHANGE quick

    Where the ‘CHANGE’ is where you need to type your format. If you wish to change the drive to NTFS, the command would look like;

    Code:
    format fs=NTFS quick
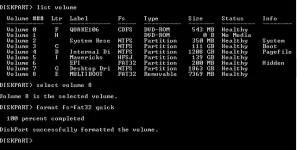
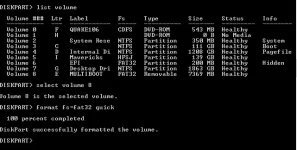
  • If you have not pressed enter, do it now. Elsewise, just wait and once it hits 100%, you are finish. If all is done correctly, your diskpart window will look like this;

pZpd3wX.webp


Moving your User files to another HDD
Guide
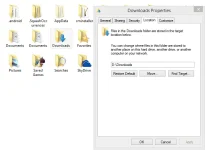
  1. Open Your user folder; C:\Users\YourUserName
  2. Right click on the folder you want on your second drive, click properties
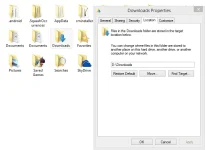
  3. Navigate to the 'Location' Tab
  4. Click 'move'
  5. Create a new folder on the HDD, in the case below I'm moving my downloads folder
  6. Call it what you want, traditionally the same name 'Downloads'
  7. Select that folder, and say yes to moving the files and what not
  8. Repeat for all folders you wish to move
P8bd1oS.webp

Remove the folders from my computer (windows 8 only)
Guide
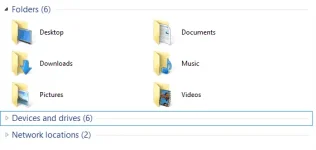
Before I progress, this involves editing the registry. If you do not like it editing the registry, this not for you. These are the folders we’re removing;

kZTORhm.webp

  1. Open Registry Editor (Run -> Regedit)
  2. Navigate to;

    Code:
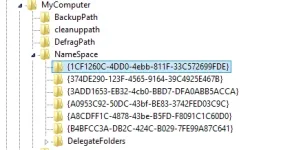
    HKEY_LOCAL_MACHINE\SOFTWARE\Microsoft\Windows\CurrentVersion\Explorer\MyComputer\NameSpace
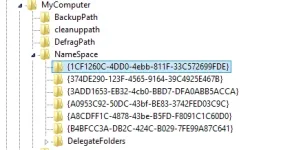
  • You will see these folders;

    K79XRkT.webp
  • You can delete ALL of these folders, but if you wish to only delete a select few, here’s the list of the folders are;

    Code:
    Videos – {A0953C92-50DC-43bf-BE83-3742FED03C9C}
    Desktop – {B4BFCC3A-DB2C-424C-B029-7FE99A87C641}
    Documents – {A8CDFF1C-4878-43be-B5FD-F8091C1C60D0}
    Music – {1CF1260C-4DD0-4ebb-811F-33C572699FDE}
    Pictures – {3ADD1653-EB32-4cb0-BBD7-DFA0ABB5ACCA}
    Downloads – {374DE290-123F-4565-9164-39C4925E467B}
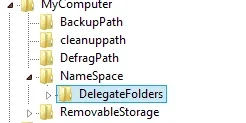
  • To delete them, either highlight the folder and press the delete button, or right click and delete them. Say okay to the warning message. Afterwards, it will look like this;

    HGIRdPL.webp
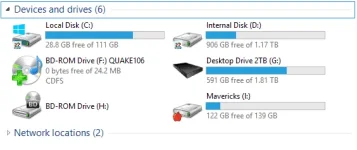
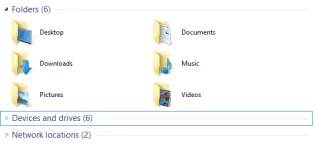
  • And that’s it, you’re done. Open my computer again, and you should see the glorious clutter-free space;
8NQS0yB.webp

If you believe you’ve made a mistake, you can easily create them again;

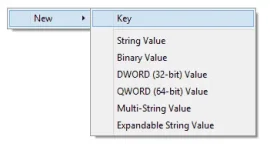
  1. Right click on the ‘NameSpace’ folder and click New -> Key
  2. A new folder (key) will be created below the NameSpace Key
  3. The space to type, simply copy and paste the folder(s) you wish to add, using the guide above. Remember to also copy the curly brackets ‘{}’
9gYsdfL.webp
Forgotten something? No I haven’t


Sources

You do not have permission to view the full content of this post. Log in or register now. – Command Resources
You do not have permission to view the full content of this post. Log in or register now. – Questions and Answers
You do not have permission to view the full content of this post. Log in or register now. – Some facts and figures
You do not have permission to view the full content of this post. Log in or register now. – Small bits of knowledge

Still need help? PM me!
or reply to this thread

Can’t get enough of me eh? If you need to contact me about various things, such as;
  • Adding something to the guide
  • Spelling mistakes (I usually make a lot of these)
  • Incorrect information (or outdated)
  • Need help on a topic, but not sure how to ask
  • Any other query you might have
360501_phCORNER.png
 
Excuse po sir, pwde pong pahelp? Nag fefreeze po kasi yung cursor ko every time nag hahang computer ko or lumalaki disk usage any possible solutions po dito? Salamat po
 
Excuse po sir, pwde pong pahelp? Nag fefreeze po kasi yung cursor ko every time nag hahang computer ko or lumalaki disk usage any possible solutions po dito? Salamat po
Nasa pinaka itaas po sir, about sa lumalaking disk usage, try mo nalang basahin baka nandun lang yung makakaturo sayo
 
HBER2Ut.webp
Anything not that is not covered by the above two, but is still useful

Diskpart
Guide

Using Disk to Find volume/disk numbers, clean a disk and Convert between MBR and GPT

Diskpart can be opened by typing ‘Diskpart’ in the CMD. It also can be opened by typing Diskpart in run (Win+R)
Diskpart is very useful in cleaning, converting and formatting disks. As well as determining the disk/volume number for other applications.
To find the Volume Number, follow this;
  1. Open CMD
  2. Type ‘Diskpart’
  3. This will open a new command window starting with DISKPART>
  4. Type ‘list volume’
    EKZXBqb.webp
  5. From the image above, if I was to see the volume for my D:, I would look under the ‘ltr’ tab, and find the number that corresponds with the letter. This case, for my D Drive, the number is 4.

The same thing goes for finding the disk number, except you type ‘List Disk’ instead of List volume, like the example below;

Also noting that if a disk has an Asterisk at the end (in the GPT table) it means that the disk is GUID Partition Table, useful for installing a häçkintosh. Windows traditionally will install windows on MBR. If there is not asterisk (*) your disk is MBR)

Converting a disk to MBR or GPT (This will ERASE THE ENTIRE DISK)

Once diskpart is opened (see above) you need to find the disk number. This can be done also by using the tutorial above.

  1. Type ‘Select Disk x’ where x is the disk you found above
  2. Type ‘Clean’ [this erases all volumes from the disk]
  3. To convert to MBR type ‘convert mbr’
  4. To convert to GPT type ‘convert gpt’

More information on DISKPART can be followed from You do not have permission to view the full content of this post. Log in or register now..


Why are Pagefile.sys and Hyberfile.sys taking all my space!

Guide
Pagefile

So let’s say, like me, you have a SSD and a HDD running together. Like many people do, you place windows and your most used programs on your SSD (for faster loading) and everything else on your HDD (which is much cheaper than a SSD). But all of a sudden, your SSD starts to run out of memory, and out of nowhere you notice this massive file which in some cases can be over 12GB in size, the pagefile.sys.

What does it do?

When you open a program, windows will move the files from the program to the RAM. This is because RAM can access a file much (much) faster than a hard drive can. When the RAM is getting rather full, windows will create a page file (a backup if you like) which will swap unused applications from the RAM into the pagefile.

Should I remove it?

This is a common myth with computer optimisation (as I spoke of above), as many people believe that removing the pagefile increases the system performance. They are wrong. In fact, not only are they wrong, but removing it completely can cause errors. If your system is using too much RAM, instead of moving unused applications into the pagefile to free up space, the applications will begin crashing as windows can’t process them properly. Many people who remove it completely, will have problems opening applications that require large amounts of RAM (VM’s, Java based applications, heavy games), and don’t know why it keeps happening. The solution, move it to another driver;

  1. Open Advanced system settings (right click my computer -> Properties -> Advanced system settings)
  2. Go to the ‘Advanced Tab’ and click settings under performance
  3. Once again, go to the ‘Advanced Tab’ and click ‘Change’ Under Virtual Memory
  4. Untick ‘Automatically manage…’
  5. With C: selected, select ‘No Paging file’ and click set. Windows will give you a warning
  6. Select your second HDD (for me it’s the D: ), and select ‘System Managed Size’ (if you are unsure, see the image below)

    XYvK2rB.webp

  7. Click Okay in all 3 windows and restart your computer. You should see the pagefile.sys (usually hidden completely, located in C:\pagefile.sys, is now gone

Hyberfile

This one is much easier than the Pagefile, and less controversial. Every time you hibernate your computer, in order for it to resume exactly how it was, windows must make a ‘snapshot’ of your system and then reload that once your computer is turned back on. Depending on the size of your computer, the file can be massive, and does not go away unless you do something about it. If you’re on a desktop computer like myself, and hibernate your computer once in a full moon, your best option is to follow the guide below. If you hibernate quite often, then unfortunately you will have to live with a large file on your HDD.


  1. This is much easier than the Pagefile. Much, easier.
  2. Open an elevated CMD and type;
    Code:
    powercfg.exe –h off

  • To test if it is off, go to the power options next to shut down in the start menu. If you cannot see the hibernate button, then you’re done. Windows will automatically delete the hyberfile.sys file.

  • To turn it back on again, type
    Code:
    powercfg –h on
Always open the CMD as Administrator

Guide
This is for more of the advanced users, as it involved editing the registry. It is one of the most helpful things I’ve ever done, as the amount of times I have to open the CMD, and just right clicking and selecting ‘Run as Administrator’ can be a real pain. Follow this, and you’ll be fine!

  1. Open Registry editor (Run -> ‘regedit’ -> enter)
  2. Navigate to the following key;
    Code:
    HKEY_CURRENT_USER\Software\Microsoft\Windows NT\CurrentVersion\AppCompatFlags\Layers
    If you do not know how to navigate, just double click on each folder icon

  • One there, right click, and select ‘New -> String’ (you right click in the empty space, not on the folder)

    7V5i0OE.webp

  • And type;
    Code:
    C:\Windows\System32\cmd.exe

    As the string name. NOTE, if your windows is installed on a drive other than c:, then put that letter!

  • Then right click on the string, and for the value type ‘RUNASADMIN’ (without quotation marks)

  • When you press ok, it should look like this;

    7NQaPeT.webp

  • Exit out of Registry edit, and you’re done!

Formatting a drive to a format unavailable
Guide
Occasionally you might come across a drive that you won’t be change it to a specific format. Certain USB’s or devices will be formatted under the exFAT format, and can sometimes not be changed to a more common one (FAT32 or NTFS). The easiest way to do this would be to use CMD, but I prefer to use Diskpart, as it is more reliable;


  1. First open CMD and type ‘Diskpart’
  2. Type ‘List volume’
  3. Then type ‘select volume x’ where x is the volume you wish to format
  4. The type the command;

    Code:
    format fs=CHANGE quick

    Where the ‘CHANGE’ is where you need to type your format. If you wish to change the drive to NTFS, the command would look like;

    Code:
    format fs=NTFS quick

  • If you have not pressed enter, do it now. Elsewise, just wait and once it hits 100%, you are finish. If all is done correctly, your diskpart window will look like this;

pZpd3wX.webp


Moving your User files to another HDD
Guide
  1. Open Your user folder; C:\Users\YourUserName
  2. Right click on the folder you want on your second drive, click properties
  3. Navigate to the 'Location' Tab
  4. Click 'move'
  5. Create a new folder on the HDD, in the case below I'm moving my downloads folder
  6. Call it what you want, traditionally the same name 'Downloads'
  7. Select that folder, and say yes to moving the files and what not
  8. Repeat for all folders you wish to move
P8bd1oS.webp

Remove the folders from my computer (windows 8 only)
Guide
Before I progress, this involves editing the registry. If you do not like it editing the registry, this not for you. These are the folders we’re removing;

kZTORhm.webp

  1. Open Registry Editor (Run -> Regedit)
  2. Navigate to;

    Code:
    HKEY_LOCAL_MACHINE\SOFTWARE\Microsoft\Windows\CurrentVersion\Explorer\MyComputer\NameSpace

  • You will see these folders;

    K79XRkT.webp

  • You can delete ALL of these folders, but if you wish to only delete a select few, here’s the list of the folders are;

    Code:
    Videos – {A0953C92-50DC-43bf-BE83-3742FED03C9C}
    Desktop – {B4BFCC3A-DB2C-424C-B029-7FE99A87C641}
    Documents – {A8CDFF1C-4878-43be-B5FD-F8091C1C60D0}
    Music – {1CF1260C-4DD0-4ebb-811F-33C572699FDE}
    Pictures – {3ADD1653-EB32-4cb0-BBD7-DFA0ABB5ACCA}
    Downloads – {374DE290-123F-4565-9164-39C4925E467B}

  • To delete them, either highlight the folder and press the delete button, or right click and delete them. Say okay to the warning message. Afterwards, it will look like this;

    HGIRdPL.webp

  • And that’s it, you’re done. Open my computer again, and you should see the glorious clutter-free space;
8NQS0yB.webp

If you believe you’ve made a mistake, you can easily create them again;

  1. Right click on the ‘NameSpace’ folder and click New -> Key
  2. A new folder (key) will be created below the NameSpace Key
  3. The space to type, simply copy and paste the folder(s) you wish to add, using the guide above. Remember to also copy the curly brackets ‘{}’
9gYsdfL.webp
Forgotten something? No I haven’t


Sources

You do not have permission to view the full content of this post. Log in or register now. – Command Resources
You do not have permission to view the full content of this post. Log in or register now. – Questions and Answers
You do not have permission to view the full content of this post. Log in or register now. – Some facts and figures
You do not have permission to view the full content of this post. Log in or register now. – Small bits of knowledge

Still need help? PM me!
or reply to this thread

Can’t get enough of me eh? If you need to contact me about various things, such as;
  • Adding something to the guide
  • Spelling mistakes (I usually make a lot of these)
  • Incorrect information (or outdated)
  • Need help on a topic, but not sure how to ask
  • Any other query you might have
360501_phCORNER.png
napaka useful since im having problems kasi sobrang lag ng pc ko.
 
Terminal sir need guide po sana sa Windows 8.1

Di ko ma install ang Office 2016 and ESET and any other apps.

Pag nira run ko installation hanggang dun lang sya sa question na "Run as Administrator" then after i-yes wala nangyayari. Wala nang lalabas or anything.

Nangyari n sya before nung first install ko pa lang ng Windows naka install naman ng Speccy and VLC pero after non wala na naman.

Nag clean install ulit ako then ganun na naman nangyari. Done the methods na available sa youtube like yung sa MDTech pero ganun pa rin.

Kahit yung installer ng printer di nagcocontinue mag install. 😥

Thank you po in advance 😊
 
Status
Not open for further replies.

About this Thread

  • 13
    Replies
  • 597
    Views
  • 11
    Participants
Last reply from:
agentcamz

Online now

Members online
1,075
Guests online
2,187
Total visitors
3,262

Forum statistics

Threads
2,299,897
Posts
29,133,470
Members
1,201,176
Latest member
acyyymiranda
Back
Top