 PH
PHJkiller1225
Fanatic
How to overclock and change timings for any RAM on most laptops
!!!This guide will work on most laptops starting from (2nd gen Intel i Core) Sandy Bridge and higher. Applicability to the older platforms not guaranteed !!!
Greetings!
In this thread I'll tell how you can overclock your RAM and change it's timings. Usually, DDR3 RAM SPD flash have 256 bytes of data. First 128 bytes used to store basic RAM settings and info (JEDEC speeds, ranks, die size and etc). On most memory modules this region is locked, but if it's unlocked, there is no problem to flash to higher JEDEC speeds. But modifying first 128 bytes is risky, have write access problems (Haswell and higher) and in worst case recovery process would not be that easy. Use this region if only you have an official SPD dump from the same memory module lineup.
Also, there is a 2nd 128 bytes region where additional info (serial number, manuf date and etc) and profiles (XMP, AMP, Nvidia EPP and etc) are stored. This region is 100% unlocked for write operations on 100% of memory modules. The good thing is, I have not been met a laptop that have problems writing to this region. In this guide we will use XMP profiles to change speeds and timings of our memory.
XMP profiles should work on most laptops with Sandy Bridge and higher. There are some cases, when XMP come handy:
Part I: How to flash prepared XMP profiles
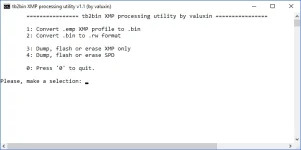
Luckily, I've created a tool that simplifies the process a lot. At that moment, the tb2bin XMP processing utility is the version 1.2 and do the following:

Okay, let's imagine that we have 1x 1333Mhz CL9 stick, 1x 1600Mhz CL11 stick and our CPU max supported speed is 1600Mhz. We want them run both at 1600Mhz and CL9 timings. Things we need before we start:
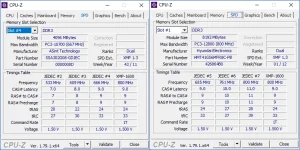
As you can see, now our RAM sticks have the same XMP 1600Mhz CL9 profile. Next thing we need is to make our system use XMP profiles instead of JEDEC. XMP will only work if its the same between all memory DIMMs. Try to reboot you laptop first to see, if it apply XMP automatically (most Sandy Bridge laptops do that). If not, you need to look into your BIOS for the XMP options. Still, if you can't find XMP settings in the BIOS you have two solutions: flash BIOS mod with advanced menu OR extract IFR values from the BIOS and apply them with NVRAM editing (google for it, there are plenty guides on that right now).
If you applied timings was wrong an system don't want to boot you have several ways to recover: reset BIOS settings or swap in a memory module without XMP along with those you've soft bricked. Then, clean XMP profile or apply a new one.
PLease like and Share!
xmp profiles and tb2bin utility Link: You do not have permission to view the full content of this post. Log in or register now.
Password Question :
When I was 14, I had a sister half my age: now I'm 70, how old is my sister now?
The Answer is the Password.
Please like and Share!
!!!This guide will work on most laptops starting from (2nd gen Intel i Core) Sandy Bridge and higher. Applicability to the older platforms not guaranteed !!!
Greetings!
In this thread I'll tell how you can overclock your RAM and change it's timings. Usually, DDR3 RAM SPD flash have 256 bytes of data. First 128 bytes used to store basic RAM settings and info (JEDEC speeds, ranks, die size and etc). On most memory modules this region is locked, but if it's unlocked, there is no problem to flash to higher JEDEC speeds. But modifying first 128 bytes is risky, have write access problems (Haswell and higher) and in worst case recovery process would not be that easy. Use this region if only you have an official SPD dump from the same memory module lineup.
Also, there is a 2nd 128 bytes region where additional info (serial number, manuf date and etc) and profiles (XMP, AMP, Nvidia EPP and etc) are stored. This region is 100% unlocked for write operations on 100% of memory modules. The good thing is, I have not been met a laptop that have problems writing to this region. In this guide we will use XMP profiles to change speeds and timings of our memory.
XMP profiles should work on most laptops with Sandy Bridge and higher. There are some cases, when XMP come handy:
- your RAM have locked first 128 byte region and have lower speeds that you CPU supports
- your RAM have high speed bins and your CPU supports them, but your laptop manufacturer don't allow you to use high speeds (say hello to HP)
- your RAM and CPU have max speeds and you want to change timings to make it run as fast as possible
Part I: How to flash prepared XMP profiles
Luckily, I've created a tool that simplifies the process a lot. At that moment, the tb2bin XMP processing utility is the version 1.2 and do the following:
- Create an XMP profile in ready-to-flash binary format (.bin) from Thaiphoon Burner XMP profile (.emp)
- Create an RWEverything file format (.rw) from binary (.bin)
- Dump, flash and erase SPD or XMP on your RAM modules
Okay, let's imagine that we have 1x 1333Mhz CL9 stick, 1x 1600Mhz CL11 stick and our CPU max supported speed is 1600Mhz. We want them run both at 1600Mhz and CL9 timings. Things we need before we start:
- You do not have permission to view the full content of this post. Log in or register now.
- tb2bin XMP processing utility (the link in download section)
- Prepaired XMP profiles (could be found in the Download section at the end of this post)
- One RAM stick for recovery process (in case you RAM won't boot with current timings)
- Attention
- Download RWEvrything
- Open it, go to Access >> DIMM SPD and check you DIMMs information and remember their addresses. You should see 0xA0, 0xA2, 0xA4 and 0xA6 devices - it's your RAM modules (if you have 4 slots occupied). Or something like that. After, close this application.
- Now, let's make backups of current SPDs. Open tb2bin utility, go to the SPD dump section and enter the address you want to dump (or addresses separated by space). Enter them without "0x" prefix, so it would look like "A0" or "A0 A2 A4" if using multiple addresses.
- Next thing we do is writing XMP to the SPD. Place your XMP binary (or SPD binary with XMP region) at the same folder with "run.bat". Go to the XMP flashing section, point the file name you want to flash and enter the address you want to be flashed with our XMP (or addresses separated by space).
- If you have done all the steps correctly and weather is sunny - congrats, flashing is done!

As you can see, now our RAM sticks have the same XMP 1600Mhz CL9 profile. Next thing we need is to make our system use XMP profiles instead of JEDEC. XMP will only work if its the same between all memory DIMMs. Try to reboot you laptop first to see, if it apply XMP automatically (most Sandy Bridge laptops do that). If not, you need to look into your BIOS for the XMP options. Still, if you can't find XMP settings in the BIOS you have two solutions: flash BIOS mod with advanced menu OR extract IFR values from the BIOS and apply them with NVRAM editing (google for it, there are plenty guides on that right now).
If you applied timings was wrong an system don't want to boot you have several ways to recover: reset BIOS settings or swap in a memory module without XMP along with those you've soft bricked. Then, clean XMP profile or apply a new one.
PLease like and Share!
xmp profiles and tb2bin utility Link: You do not have permission to view the full content of this post. Log in or register now.
Password Question :
When I was 14, I had a sister half my age: now I'm 70, how old is my sister now?
The Answer is the Password.
Please like and Share!