PHC - JOSHIE
Forum Guru
Needed:
Http Injector ( Latest)
Browser
Note: This Tutorial is for Advance Ehi Makers not for the Beginners
➡➡ ADVANTAGE⬅⬅
No Need Remote Proxy
No Need Payload
 Fast Connection
Premium Account
Stable Connection
So Let's Proceed!. Follow the Simple steps.
1st Step:
Create an SSH/SSL ACCOUNT
>>> www . boostvpn . net <<
Note: BoostVpn not support Multi Login
2nd Step:
After makagawa ng ssh account
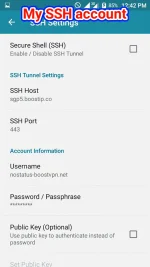
Open niyo Http Injector clear settings/data nyo muna bago kayo gumawa ng new config. Ilagay nyo yung account details mo sa SSH setting ng Http Injector.
This is my Sample Account:
IP Address: sgp5.boostip.co
Username: nostatus-boostvpn.net
Password: QR
SSH SSL/TLS: 442, 443
SSH Dropbear: 110, 143, 993, 80
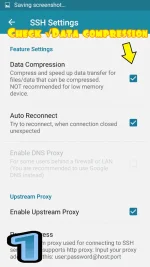
3rd Step:
After mo malagay yung account details mo sa SSH ACCOUNT , scroll down ka sa baba then Check mo yungData Compression
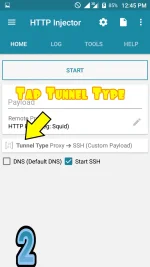
4th Step:
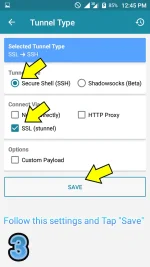
Back ka sa Home. Then sa baba makikita mo yung Tunnel tap mo yun then follow this settings:
Tunnel Type ( Secure Shell)
Connect Via ( SSL TUNNEL).
Tap " SAVE"
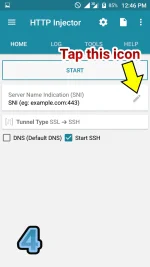
5th Step:
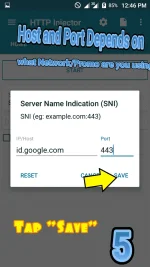
Sa Homepage may makikita kang SNI. TAP mo yung Pencil Icon then ilagay mo ito.
For Globe
Host: id . google . mu or beacons3 . gvt2 . com ( Remove space)
Port : 443
For Smart
Host: KRAM . fbcdn . net or m . Facebook . com or connect . Facebook . com
Port: 3128, 443
( remove space )
For TNT
IG10
Host: m . instagram . com
Port: 3128 , 443 ( remove space )
SNAP10
Host: m . snapchat . com
Port: 3128 , 443 ( remove space )
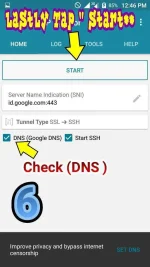
6th Step:
Before Tapping " Start " Check the DNS.
That's It")
Please do feedback for more tutorials and Ehi.
Http Injector ( Latest)
Browser
Note: This Tutorial is for Advance Ehi Makers not for the Beginners
➡➡ ADVANTAGE⬅⬅
No Need Remote Proxy
No Need Payload
Fast ConnectionPremium AccountStable ConnectionSo Let's Proceed!. Follow the Simple steps.
1st Step:
Create an SSH/SSL ACCOUNT
>>> www . boostvpn . net <<
Note: BoostVpn not support Multi Login
2nd Step:
After makagawa ng ssh account
Open niyo Http Injector clear settings/data nyo muna bago kayo gumawa ng new config. Ilagay nyo yung account details mo sa SSH setting ng Http Injector.
This is my Sample Account:
IP Address: sgp5.boostip.co
Username: nostatus-boostvpn.net
Password: QR
SSH SSL/TLS: 442, 443
SSH Dropbear: 110, 143, 993, 80
3rd Step:
After mo malagay yung account details mo sa SSH ACCOUNT , scroll down ka sa baba then Check mo yung
Data Compression4th Step:
Back ka sa Home. Then sa baba makikita mo yung Tunnel tap mo yun then follow this settings:
Tunnel Type ( Secure Shell)
Connect Via ( SSL TUNNEL).
Tap " SAVE"
5th Step:
Sa Homepage may makikita kang SNI. TAP mo yung Pencil Icon then ilagay mo ito.
For Globe
Host: id . google . mu or beacons3 . gvt2 . com ( Remove space)
Port : 443
For Smart
Host: KRAM . fbcdn . net or m . Facebook . com or connect . Facebook . com
Port: 3128, 443
( remove space )
For TNT
IG10
Host: m . instagram . com
Port: 3128 , 443 ( remove space )
SNAP10
Host: m . snapchat . com
Port: 3128 , 443 ( remove space )
6th Step:
Before Tapping " Start " Check the DNS.
That's It
Please do feedback for more tutorials and Ehi
. Attachments
-
 Screenshot_2018-02-15-11-51-26.webp155.3 KB · Views: 20
 -
 1518670144-picsay.webp50.3 KB · Views: 14
 -
 1518670249-picsay.webp62.7 KB · Views: 21
 -
 1518670341-picsay.webp43.4 KB · Views: 17
 -
 1518670455-picsay.webp52.1 KB · Views: 15
 -
 1518670513-picsay.webp42.4 KB · Views: 17
 -
 1518670707-picsay.webp87.4 KB · Views: 16
 -
 1518670848-picsay.webp67.5 KB · Views: 19