 PH
PHI posted LibreChat AI - How To Host Your Own AI recently, and sa tingin ko marami sa inyo ang hindi pa gamay ang galawan sa Google Cloud Platform (GCP.) As VMs are becoming more and more "no easy configuration" type of thing, nagiging multo na rin sila madalas kaya kung hindi mo alam ang pasikot-sikot, hindi mo talaga malalaman.
Bawat isa sa atin ay may kanya-kanyang paraan. Pero kung meron sa inyo diyan ang naguguluhan, walang sariling paraan at gustong sumubok, you can do it my way... the "Soul Calibre" way.. gets?
This tutorial, and the YAML configuration below, is completely for Ubuntu 24 and up na LTS during the deployment process. Not for DEBIAN. I repeat, UBUNTU ito, preferably the 24.04 LTS deployment sa GCP. Check nyo na lang sa thread ko yung exact OS configuration.
So, heto na...
Wag magpaka-8080. Basahin mo muna ito bago mo i-copy paste yang YAML code na nasa baba.
PS:
Bawat isa sa atin ay may kanya-kanyang paraan. Pero kung meron sa inyo diyan ang naguguluhan, walang sariling paraan at gustong sumubok, you can do it my way... the "Soul Calibre" way.. gets?
This tutorial, and the YAML configuration below, is completely for Ubuntu 24 and up na LTS during the deployment process. Not for DEBIAN. I repeat, UBUNTU ito, preferably the 24.04 LTS deployment sa GCP. Check nyo na lang sa thread ko yung exact OS configuration.
So, heto na...
- Una, tanungin mo ang sarili mo kung saan ka magko-connect sa VM. Sa PC ba or sa phone? Kung sa PC, proceed. Kung sa phone, try mo na lang gamit ang termux.
- Sa PC, run CMD as an 'administrator'. Sa CMD terminal, run:
- ssh-keygen -t ed25519
- Press enter sa keyboard 3 times or hanggang sa ma-generate yung PubKey
- ssh-keygen -t ed25519
- Open File Explorer and go to the .ssh directory para makuha ang PubKey
- C:\Users\YourUsername\.ssh\id_ed25519.pub
- Open that file using notepad and set it aside. Kakailanganin nyo yang PubKey na yan.
- C:\Users\YourUsername\.ssh\id_ed25519.pub
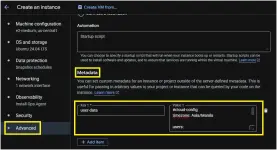
- Sa GCP, start with the deployment process. Dun sa ADVANCED > METADATA:
- Type 'user-data' sa KEY 1
- Copy the YAML code below, edit it, make sure it suits your own configuration, and paste it dun sa VALUE 1. Pero bago mo i-copy paste, basahin mo ang muna at intindihin itong buong thread. See screenshot below para may idea ka kung saan banda.
- Balik ka dun sa NETWORKING, maglagay ka ng 'network tag' para mas madali mong ma-identify yang VM. Pwede mong ilagay ang "project-one". Complete deploying the VM then go to VPC Network > Firewall > Create Firewall rule.
- Name: new-ssh-port
- Targets: Specified target tags
- Target tags: project-one
- Or whatever ang inilagay mo na network tag nung VM.
- Source IPv4 Ranges: 0.0.0.0/0
- Pero kung gusto mong higpitan pa ang security, ilagay mo diyan ang Public IP/24 ng ISP mo.
- Protocols and ports: Specified protocols and ports
- TCP: DITO ILALAGAY KUNG ANO MANG PORT ANG NAKALAGAY DUN SA YAML CODE.
- 2026
- ----> Leave everything else as their default value. Simple create the rule.
- After deploying the VM:
- GCP → VM Machine → SSH. Authorize to connect.
- sudo su && sudo reboot
- GCP → VM Machine → SSH. Authorize to connect.
- Open CMD and connect: ssh -p 2026 adminaccount@Static.VM.IP.Address
- sudo passwd
- Update you password to whatever you want. May certain commands na kakailanganin mo ito kaya palitan mo para hindi ka na mahirapan.
- sudo passwd
Wag magpaka-8080. Basahin mo muna ito bago mo i-copy paste yang YAML code na nasa baba.
- Pwede nyong palitan yang 'adminaccount' sa "name". Yan ang magiging username ng VM mo. (eg.: ssh -p 2026 adminaccount@Static.VM.IP.Address)
- Dun sa baba ng "ssh-authorized-keys", dun mo i-paste yung laman ng 'http://id_ed25519.pub/' file.
- Pwede mo ring palitan yung PORT. Bahala ka kung anong port ang gusto mong gamitin. I would suggest na palitan para iwas port 22. Itong port na ito ang ilalagay mo dun sa TCP Firewall Rule.
YAML:
#cloud-config
timezone: Asia/Manila

users:
  - name: adminaccount
    groups: sudo
    shell: /bin/bash
    sudo: ALL=(ALL) NOPASSWD:ALL
    ssh-authorized-keys:
      - "PASTE YOUR ACTUAL PUBKEY HERE. YUNG NAKUHA MO SA PC MO."

ssh_pwauth: false
disable_root: true

packages:
  - ufw
  - unattended-upgrades

write_files:
  - path: /etc/ssh/sshd_config.d/99-custom.conf
    owner: root:root
    permissions: '0644'
    content: |
      Port 2026
      PermitRootLogin no
      PasswordAuthentication no
      PubkeyAuthentication yes
      PermitEmptyPasswords no

runcmd:
  - ufw allow 2026/tcp
  - ufw --force enable
  - systemctl restart ssh
  - dpkg-reconfigure -plow unattended-upgrades
PS:
- At dahil nga naka-define ang PubKey ng PC mo sa "ssh-authorized-keys", only your PC can connect.
- Kung ang inilagay mo sa "Source IPv4 Ranges" ay ang Public IP ng ISP mo, tapos hindi yan static, hindi ka makaka-access sa VM mo kapag nagpalit na ng leasing IP ang modem mo.
- Naka-define ang permissions sa /etc/ssh/sshd_config kaya naka-block ang root login.
- Lastly, hindi root ang gamit mong user. Elevated user kaya may certain commands na kailangan mong gumamit ng 'sudo' as a prefix.

.webp "(ditto) :(ditto):")

 mag avail ako ulit kala ko kase di mag work yung ginawa ko eh na refund kuna. bago ko na fix. yung diko magawa nun. pwede pa kaya mag avail ulit kuya ? if ever na mag avail ako? pero personal gmail kuna po gagamitin?