PH
PHExperiment :
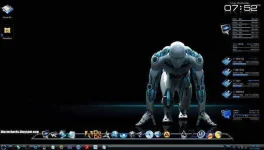
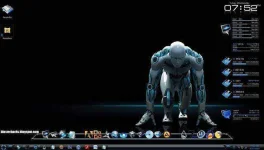
You can Make your desktop more amazing and awesome, by merging all skins's widgets/pulgins together , take a look, i've made it with blue vision alpha and jarvis.
1st of all you need to install rainmeter on your computer, for installing these themes, rainmeter is best desktop customization software these themes are Made for windows 7, but you can use it on windows xp too.
1- BlueVision Alpha
Blue vision aplha v2.0 is one of the best rainmeter skins, you'll Get lot of attractive widgets in this theme, you can make it more awesome by changing background.

Download Link
You do not have permission to view the full content of this post. Log in or register now.
2. Jarvis (Iron Man Skin)
This is my favorite and so it made it’s place on my desktop.
Jarvis is a Iron main inspired rain meter skin, you can convert into häçkers theme using new widgets and changing background image,Jarvis skin's central interface is damn cool.

Download Link
You do not have permission to view the full content of this post. Log in or register now.
3- Alien 3d Rainmeter Skin
alien 3d is amazing skin, it will give a 3d Look to your desktop.

Download Link
You do not have permission to view the full content of this post. Log in or register now.
4-Blue HDD
Download Link
You do not have permission to view the full content of this post. Log in or register now.
How to install them!
There are two ways to install Rainmeter skins which are Automatically and Manually. If
you have a Rainmeter skin with extension .rmskin then you automatically install the skins
with double click. Again you have a skin with extension like .zip/.rar/.7z archive then you
have unzip the skin archive put the unzipped files into the Rainmeter skin folder. Here I’m
going to show the two ways to install Rainmeter skins. Install Rainmeter Skins
Automatically You can easily install a Rainmeter skin automatically if it comes with extension .rmskin. The .rmskin is a skin format of Rainmeter skin packager. The .rmskin skin extension is associated with Rainmeter skin installer so, when you double the skin it get installed automatically. Generally a Rainmeter skin with .rmskin extension may contain different components if the author of the skin associate those components. These
components may include Skins, Layouts, Plugins, Fonts, Addons and so on. Install Rainmeter Skins Manually Rainmeter skins which comes in a archive with extension like .zip/.rar/.7z and other. To install these types of skins you have to unzip the skin archive. To extract
the skin archive you must have a archive extractor installed on your computer. You can use Winrar, 7-Zip or other software to extract the skin archive. After extracting the skin archive copy the extracted folder paste into the Rainmeter skin directory. You access Rainmeter skin directory following the path below: Windows 7: C: UsersYourNameDocumentsRain meterSkins Windows XP: C ocuments and SettingsYourNameMy DocumentsRainmeterSkins Finally, right-click the Rainmeter icon from the notification area
and select Refresh all. The new skins you installed will now be available to load from the
Manage window or context menus.
You can Make your desktop more amazing and awesome, by merging all skins's widgets/pulgins together , take a look, i've made it with blue vision alpha and jarvis.
1st of all you need to install rainmeter on your computer, for installing these themes, rainmeter is best desktop customization software these themes are Made for windows 7, but you can use it on windows xp too.
1- BlueVision Alpha
Blue vision aplha v2.0 is one of the best rainmeter skins, you'll Get lot of attractive widgets in this theme, you can make it more awesome by changing background.
Download Link
You do not have permission to view the full content of this post. Log in or register now.
2. Jarvis (Iron Man Skin)
This is my favorite and so it made it’s place on my desktop.
Jarvis is a Iron main inspired rain meter skin, you can convert into häçkers theme using new widgets and changing background image,Jarvis skin's central interface is damn cool.
Download Link
You do not have permission to view the full content of this post. Log in or register now.
3- Alien 3d Rainmeter Skin
alien 3d is amazing skin, it will give a 3d Look to your desktop.
Download Link
You do not have permission to view the full content of this post. Log in or register now.
4-Blue HDD
Download Link
You do not have permission to view the full content of this post. Log in or register now.
How to install them!
There are two ways to install Rainmeter skins which are Automatically and Manually. If
you have a Rainmeter skin with extension .rmskin then you automatically install the skins
with double click. Again you have a skin with extension like .zip/.rar/.7z archive then you
have unzip the skin archive put the unzipped files into the Rainmeter skin folder. Here I’m
going to show the two ways to install Rainmeter skins. Install Rainmeter Skins
Automatically You can easily install a Rainmeter skin automatically if it comes with extension .rmskin. The .rmskin is a skin format of Rainmeter skin packager. The .rmskin skin extension is associated with Rainmeter skin installer so, when you double the skin it get installed automatically. Generally a Rainmeter skin with .rmskin extension may contain different components if the author of the skin associate those components. These
components may include Skins, Layouts, Plugins, Fonts, Addons and so on. Install Rainmeter Skins Manually Rainmeter skins which comes in a archive with extension like .zip/.rar/.7z and other. To install these types of skins you have to unzip the skin archive. To extract
the skin archive you must have a archive extractor installed on your computer. You can use Winrar, 7-Zip or other software to extract the skin archive. After extracting the skin archive copy the extracted folder paste into the Rainmeter skin directory. You access Rainmeter skin directory following the path below: Windows 7: C: UsersYourNameDocumentsRain meterSkins Windows XP: C
ocuments and SettingsYourNameMy DocumentsRainmeterSkins Finally, right-click the Rainmeter icon from the notification areaand select Refresh all. The new skins you installed will now be available to load from the
Manage window or context menus.