PH
PHLooking for a way to share files between two computers using LAN cable? Well, your search finally ends here. This step by step guide (with a video tutorial in the end) has helped thousands of people who want to transfer files from PC to PC using Ethernet cable. And I am sure it will work for you as well. So, let get started.
Hi, I’ve written this post 5 years back (don’t worry it’s still working), but now since Wi-Fi networks are everywhere, you may want to consider them for file sharing. The advantage of using a Wi-Fi connection is – you don’t have to configure much settings. In fact, some software that can create a WiFi hotspot of their own, so you don’t even need a router.
So, I never liked using Pen drives to share large data (like games, movies, etc.) so the only thing I’m left with, was LAN cable.
When to use LAN cable to send files from one computer to another
It’s a tedious thing when you have to keep on plugging and removing pen drive everytime you want to transfer the data. And if you are like me, who hate to do this, then you have come to right place.
Advantage of LAN cable over others
Windows 7, 8, 10
Things you Need
Step 1
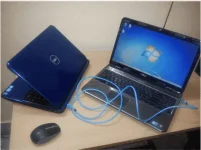
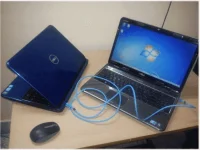
Connect both computers with a LAN cable. You can use any LAN cable (crossover cable or ethernet cable); it doesn’t matter in the modern computer.
Step 2
OK, now you have to turn ON sharing option on both computers.
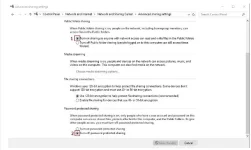
Go to Control Panel > Network and Internet > Network and Sharing Center > Advanced sharing settings.
And make sure you turn on network detection and turn OFF Password Protection. This way, you don’t have to type in your password each time, when you are trying to access it from another computer.
However, this is also a significant security risk. So, make sure you turn on Password protection once you are done.

Step 3
Bring both the computers on the same network.
1. Open Control Panel > Network and Sharing Center.
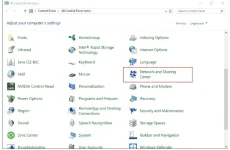
2. You will see Local Area Connection or Ethernet.
3. Right-click it and go to its properties.
4. You will see TCP/ ivp4 option there and select its properties.
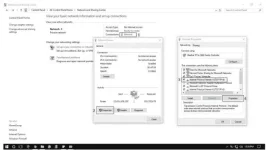
5. Select this use the following IP address.
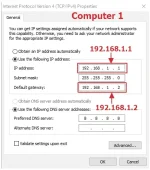
Put the following value on 1st computer
Put the following value on 2nd computer
If everything works right, you will see the two computer name in the Networks settings.
Step 4
Share a folder on LAN
Assuming that you have connected the cable properly and enable the sharing option now it’s time send files from one computer to another, this is quite simple
1. Select the folder you want to share, right-click it.
2. From the drop down option, click on the share with > specific people.
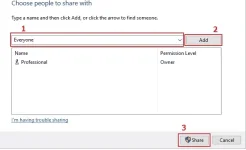
3. On the drop down menu select Everyone > add > click share.
If you have question.
Comment below then i review it, Thank you,
Dont forget to drop and tap this Like button for more incoming useful Thread.
Hi, I’ve written this post 5 years back (don’t worry it’s still working), but now since Wi-Fi networks are everywhere, you may want to consider them for file sharing. The advantage of using a Wi-Fi connection is – you don’t have to configure much settings. In fact, some software that can create a WiFi hotspot of their own, so you don’t even need a router.
So, I never liked using Pen drives to share large data (like games, movies, etc.) so the only thing I’m left with, was LAN cable.
When to use LAN cable to send files from one computer to another
It’s a tedious thing when you have to keep on plugging and removing pen drive everytime you want to transfer the data. And if you are like me, who hate to do this, then you have come to right place.
Advantage of LAN cable over others
- Fast data transfer
- Save time
- Looks geeky
Windows 7, 8, 10
Things you Need
- Two laptops (mandatory)
- A LAN cable, cat 5 will work fine (obviously)
- Little bit of your time and patience (only if it’s your first time)
Step 1
Connect both computers with a LAN cable. You can use any LAN cable (crossover cable or ethernet cable); it doesn’t matter in the modern computer.
Step 2
OK, now you have to turn ON sharing option on both computers.
Go to Control Panel > Network and Internet > Network and Sharing Center > Advanced sharing settings.
And make sure you turn on network detection and turn OFF Password Protection. This way, you don’t have to type in your password each time, when you are trying to access it from another computer.
However, this is also a significant security risk. So, make sure you turn on Password protection once you are done.
Step 3
Bring both the computers on the same network.
1. Open Control Panel > Network and Sharing Center.
2. You will see Local Area Connection or Ethernet.
3. Right-click it and go to its properties.
4. You will see TCP/ ivp4 option there and select its properties.
5. Select this use the following IP address.
Put the following value on 1st computer
- Ip Address 192.168.1.1
- Subnet mask 225.225.225.0
- Default gateway 192.168.1.2
Put the following value on 2nd computer
- Ip address 192.168.1.2
- Subnet mask 225.225.225.0
- Default gateway 192.168.1.1
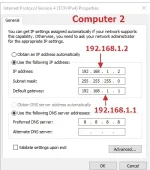
If everything works right, you will see the two computer name in the Networks settings.
Step 4
Share a folder on LAN
Assuming that you have connected the cable properly and enable the sharing option now it’s time send files from one computer to another, this is quite simple
1. Select the folder you want to share, right-click it.
2. From the drop down option, click on the share with > specific people.
3. On the drop down menu select Everyone > add > click share.
If you have question.
Comment below then i review it, Thank you,
Dont forget to drop and tap this Like button for more incoming useful Thread.