Goodmorning guys. ") Im here again.
Im here again. ") Dahil nawalan ako ng Trabaho. Pampalubag Loob. Share ko tong tricks na Experiments ko.
Dahil nawalan ako ng Trabaho. Pampalubag Loob. Share ko tong tricks na Experiments ko.
Wag nang paligoy-ligoy pa.
Main Requirements:
First, Install Requirements applications,
How to proper installation of Softhether.
If Installation is already done.
Now Run SSCap.
-Hanap na lang kayo working account. haha. tatamad ako gumawa.
Follow my Lead:
On sscap Setting.
Local Socks5: 8989
Lagyan nyo lang ng check yung allow connection from other computer.
Tapos connect. -TakeNote- Dpat Low Latency Dapat yung lumabas sa sscap nyo.
Punta naman tayo sa ether.
Follow my Lead again.
-VPN Gate Public Relay Server
- Proxy Setting
-Connect via HTTP
-Host Name: 127.0.0.1
-Port: 25378 (Depende sa kung ano ang nakalagay na HTTP sa SSCap nyo)
-Press Okay. Then Pili na kayo ng Server. Mas Maganda kung Malaki yung Line Speed na gagamitin nyo.
-Take Note.
Kung anong Server ang Ginamit nyo. Ganun din server o country ang gamitin nyo sa Ether.
Thats all. Simply Like / Follow is Enough.
Im here again. Dahil nawalan ako ng Trabaho. Pampalubag Loob. Share ko tong tricks na Experiments ko. Disclaimer:
Para po dun sa mga nauna sa Tricks na to. Credits na rin sayo. Hindi ko lang alam kung meron na nga.
Wag nang paligoy-ligoy pa.
Main Requirements:
Soft Ether:
You do not have permission to view the full content of this post. Log in or register now.
Sscap:
Download Linkshttps://sourceforge.net/projects/sscap/
Mirror:You do not have permission to view the full content of this post. Log in or register now.
Sccap Server accounts
Hanap na lang kayo ng mga ss sites dito sa ating mumunting tambayan.
First, Install Requirements applications,
How to proper installation of Softhether.
What is Softether?.
SoftEther VPN is one of the world's most powerful and easy-to-use multi-protocol VPN software, made by the good folks at the University of Tsukuba, Japan. It runs on Windows, Linux, Mac, FreeBSD and Solaris and is freeware and open-source. You can use SoftEther for any personal or commercial use free of charge.
Install on Windows and Initial Configurations
This section describes how to install SoftEther VPN Server to an operating system with Windows 2000 or later. This assumes that in the Windows operating system, no extra application software is installed after performing a clean install of the system. This also assumes that the Windows function for blocking communication to TCP/IP ports from the outside (firewall function) is disabled.
Selecting the Installation Mode
As described in You do not have permission to view the full content of this post. Log in or register now., SoftEther VPN Server can be operated in either service mode or user mode. When configuring VPN Server for use as part of an everyday operation system, we recommend installing SoftEther VPN Server in service mode. The installer for the Windows version of VPN Server installs the VPN Server program to the system in service mode.
Installation Procedure Using the Installer
Preparing the Installer File
The installation of the Windows version of SoftEther VPN Server is very easy as it is almost completely performed automatically. To install VPN Server, you can download the latest VPN Server installer file from the SoftEther VPN Project website (You do not have permission to view the full content of this post. Log in or register now.).
The VPN Server Windows version installer file is an executable file with the name vpnserver-build-number-win32-x86.exe.
VPN Server Installer
Starting the Installer
Start the installer by double-clicking the VPN Server installer file. The Windows Installer-based installer starts automatically. Using the installation wizard, you can select the name of the installation directory. (By default, the program is installed to Program Files\SoftEther VPN Server on the system drive.) The VPN Server process writes large log files to the installation directory, so we recommend selecting an area on the hard drive that has high transfer rate and a large amount of unused space.
Specifying the VPN Server Installation Directory.
During the installation, the end-user license agreement may be displayed. Please thoroughly read the agreement. If you agree to the terms and conditions, the installation continues.
VPN Server End-User License Agreement.
The installer automatically registers the SoftEther VPN Server system service and sets the program to automatically start in background mode at Windows startup.
Precautions After Installation
When installation of the Windows version of VPN Server is completed, the SoftEther VPN Server service is already running in the background on the Windows system. Normally, the computer does not have to be restarted after installation of the program. However, if you expect to use the local bridge function while using a network adapter that supports hardware offloading, as described in You do not have permission to view the full content of this post. Log in or register now., we recommend that you restart the computer.
To check whether the VPN Server installer properly installed the SoftEther VPN Server service to the Windows system, click [Control Panel] > [Administrative Tools] > [Services], and check that [SoftEther VPN Server] is displayed on the list of services.
VPN Server Install Finished.
Managing VPN Server with VPN Server Manager
VPN Server Manager
After VPN Server is installed, the program can be properly configured and the VPN client computers can be provided with the function that allows the program to operate as a VPN server.
SoftEther VPN Server Manager can be used on Windows to manage VPN Server. For information about the detailed management method, please refer to You do not have permission to view the full content of this post. Log in or register now..
Start VPN Server Manager, which is installed at the same time as the Windows version of VPN Server, connect to [localhost] (the host itself) on the server window, and configure the default settings.
To configure or manage the Linux or other Unix version of VPN Server, you can also use the Windows version of VPN Server Manager from a remote computer. For information about manually installing VPN Server Manager on a computer without VPN Server installed, please refer to You do not have permission to view the full content of this post. Log in or register now..
Default Settings of VPN Server Manager
When VPN Server Manager is started for first time, nothing is registered to the [SoftEther VPN Server Connection Settings] list on the startup window.
VPN Server Manager.
To create a connection setting, click [Create New Setting] and specify the host name, port number, and other information of VPN Server to which to establish a management connection. Once a connection setting is registered, it is displayed the next time VPN Server Manager is started.
Window for Creating a Connection Setting.
After creating a connection setting, double-click that connection setting to try to connect to VPN Server.
Managing with vpncmd
You can also use the command line-based vpncmd software to configure and manage VPN Server. This is helpful in cases where VPN Server is installed to a Linux or other Unix operating system and a separate Windows computer is not available locally, therefore VPN Server Manager cannot be used. In this case, you can use vpncmd to configure the default settings. You can also use vpncmd to configure the settings on the Windows version of VPN Server. For information about detailed vpncmd operations, please refer to You do not have permission to view the full content of this post. Log in or register now..
SoftEther VPN Project recommends using VPN Server Manager on a Windows computer to configure and manage VPN Server and using vpncmd as a supplemental management utility for automating simple repetitive tasks.
Starting and Stopping Service
The installer for the Windows version of VPN Server automatically installs the SoftEther VPN Server service. This service continually operates while Windows is running, and it automatically shuts down when Windows shuts down.
If the service must be restarted for management reasons or because VPN Server operations become unstable, you can click [Control Panel] > [Administrative Tools] > [Services], and start or stop the service. An easier and more reliable method is to call the net command at the command prompt and start or stop the service.
To stop the service, type the following command.
> net stop sevpnserver
To start the service, type the following command.
> net start sevpnserver
If, in the unlikely event, the VPN Server process hangs and cannot be controlled using the net command, you can use Task Manager in Windows to forcibly terminate the vpnserver.exe process.
7.2.7 Adding and Deleting the Service
You can add or delete the service for the vpnserver.exe process using the method described in the description of the service mode of the Windows SoftEther VPN Server in You do not have permission to view the full content of this post. Log in or register now.. You can use this method, for example, to move all setting files in the VPN Server installation directory to a different directory or hard drive, and then re-register the process as a service. (However, we cannot recommend using this method as the uninstaller may not be able to properly uninstall the program.)
7.2.8 Limitations When Starting in User-mode
We recommend operating the Windows version of VPN Server as a service mode program, but you can also start VPN Server in the user mode by using the method described in You do not have permission to view the full content of this post. Log in or register now.. When VPN Server is started in user mode, critical security holes, such as buffer overruns, exist temporarily on the VPN Server, but because only user accounts starting VPN Server in user mode would be affected if an attack were to occur, VPN Server can be used relatively securely and safely. However, SoftEther VPN Project does not recommend actually operating VPN Server in user mode for the following reasons.
- The local bridge function cannot be used. (For details, please refer to You do not have permission to view the full content of this post. Log in or register now..)
- Some features of the disaster recovery function, such as automatic recovery when an error occurs in a self process, cannot be used. (For details, please refer to You do not have permission to view the full content of this post. Log in or register now..)
- To start the VPN Server process in user mode, the user must remained logged on to the server. The user cannot operate VPN Server when the user logs off or when no users are logged on to the server after Windows starts. For these reasons, user mode is not suited for actual operation of VPN Server.


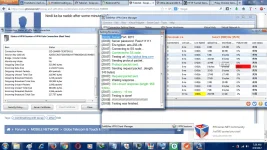
If Installation is already done.
Now Run SSCap.
-Hanap na lang kayo working account. haha. tatamad ako gumawa.
Follow my Lead:
On sscap Setting.
Local Socks5: 8989
Lagyan nyo lang ng check yung allow connection from other computer.
Tapos connect. -TakeNote- Dpat Low Latency Dapat yung lumabas sa sscap nyo.
Punta naman tayo sa ether.
Follow my Lead again.
-VPN Gate Public Relay Server
- Proxy Setting
-Connect via HTTP
-Host Name: 127.0.0.1
-Port: 25378 (Depende sa kung ano ang nakalagay na HTTP sa SSCap nyo)
-Press Okay. Then Pili na kayo ng Server.
Mas Maganda kung Malaki yung Line Speed na gagamitin nyo. -Take Note.
Kung anong Server ang Ginamit nyo. Ganun din server o country ang gamitin nyo sa Ether.
Thats all.
Simply Like / Follow is Enough.