 PH
PHDisabling startup items
One of the best ways to unburden your computer and quickly free up resources, is to disable items that automatically launch when Windows boots. These startup items not only suck up system resources like little vampires, they also often cause your computer to boot longer.
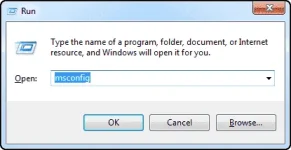
The old school way to deal with startup items is to use the “System Configuration” (“SysConfig”) utility on Windows 7. Launch a “Run” window by typing “WIN + R” and then “msconfig.”
On the “System Configuration” utility, select the “Startup” tab. You do want to exercise some caution here. While you won’t break your system by disabling everything, you may disable some programs that are genuinely useful, like Dropbox.
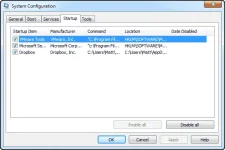
In the preceding screenshot, there’s not a whole lot to pore over because it was taken on a virtual machine that has the bare minimum of programs installed. Regardless, to disable a startup program, uncheck the box next to it, and restart your system.
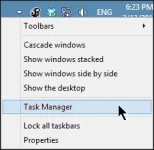
Let’s look at our Windows 8.x setup to see a more useful example. If you try to use “Sysconfig” on Windows 8.x, it will simply redirect you to the “Task Manager,” which can be more easily accessed by going directly to it either from the Taskbar:
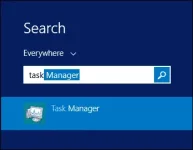
Or simply hit “WIN” and type “task” and it should appear as the top search result:
It’s worth noting that you can also use the CTRL + SHIFT + ESC shortcut key combination to bring up Task Manager without clicking anywhere.
When the “Task Manager” opens, select the “Startup” tab and behold the glory of your computer’s burdens. You can see your startup items, their status, and the impact they have on your system. You can sort them of course, by clicking the headers. In the following screenshot, we’ve sorted by “Startup impact.”
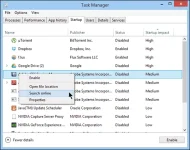
If you’re unsure what does what, you can right-click on any item and selet “Search online” to find out exactly what something is and what it does.
According to Microsoft, impact is based on how much CPU and disk usage occurs at startup:
Microsoft You do not have permission to view the full content of this post. Log in or register now. on how to deal with several categories of startup apps, including utilities that sync your PC or for backup and recovery, updaters, notifiers, and more.
It’s safe to say that in any event, you can disable most, if not all startup items and it will not adversely affect your system. That said, as we mentioned earlier, if you do disable everything, you may lose functionality that you otherwise wanted. In the above case, if we disabled “Dropbox” it would no longer start automatically and sync changes. We’d instead have to manually start it, so we might as well leave it enabled.
Disk Cleanup
The “Disk Cleanup” utility is a very simple tool that allows you quickly delete stuff like temporary and cache files so you can free up space on your hard drive(s).
In Windows 7 you can open it from Start -> All Programs -> Accessories -> System Tools.
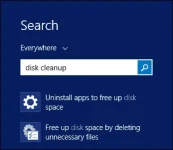
In Windows 8.x, you have several options. The easiest is to hit the “WIN” key and type “disk cleanup” and then choose “Free up disk space by deleting unnecessary files.”
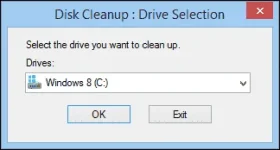
When “Disk Cleanup” begins, if you have more than one drive installed, you will need to choose the one you want to cleanup first. Here in our example, we choose the system drive (C .
.
The “Disk Cleanup” tool will let you scroll through and see what is taking up space. You can read a brief description of what it is you’d be deleting. You can also view the files at any time by clicking on the “View Files” button, or if you have administrative access, you can click “Clean up system files” and the “Disk Cleanup” tool will restart in admin mode.
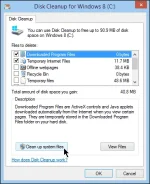
Note here in the following screenshot, we’ve restarted in administrative cleanup mode and “Disk Cleanup” has found another 500 MB of space it can free up (Windows Update files). This will give us 455 MB versus 90 MB in non-admin mode.
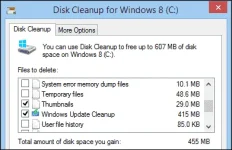
Note also, in admin mode you gain another tab named “More Options,” which gives us further ways to free up valuable disk space. Of particular note here is the “System Restore and Shadow Copies” option, which deletes all but the most recent “system restore” points. If you’ve been using your computer for a while and you’ve never cleaned out your restore points, this option can sometimes free up gigabytes of space without adversely affecting your computer – assuming everything is running smoothly at the moment so you don’t need to roll back any recent changes.
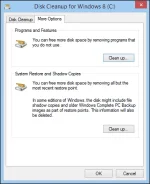
Note also, the “Programs and Features” clean up button. If you click this, it will open the “Programs and Features” control panel, which will let you uninstall unnecessary and unused applications, which we’re going to now talk about in the next section.
Uninstalling Applications and Freeing up Disk Space
Let’s say that you disable something in your startup items, but then you realize that you don’t really use that program. In that case, why not just uninstall it? That way, not only do you remove the startup item, but the whole useless application, thus freeing up disk space in the process.
On Windows 7 and Windows 8.x, removing an application is accomplished by opening the “Programs and Features” control panel. On Windows 7, open the Control Panel from the “Start” menu.
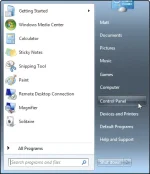
On Windows 8.x, you can access the “Programs and Features” control panel directly by right-clicking on the “Start” button and selecting it from the context menu.
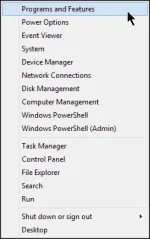
With the “Programs and Features” control panel open, you can click on the application you want to uninstall.
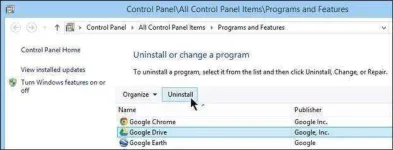
In the above example, we see that from the previous section that Google Drive has a high impact on startup, and since we use Dropbox as our primary cloud service, we can just remove Drive and use it when we need to through the web interface.
The approach you take to this is completely up to you. You may decide you want to just disable the startup program or remove the whole shebang. That said, there’s an even easier way to do all this.
Using CCleaner
You do not have permission to view the full content of this post. Log in or register now. is a free program from Piriform software that takes the work out of cleaning up your computer. Make sure that you download the “Slim” installer version that doesn’t contain any toolbars or other crapware. Yeah, it’s ironic that a software named “crap cleaner” actually distributes more crapware by default, but as long as you don’t download the wrong version you’ll be fine. And it is otherwise a good piece of software.
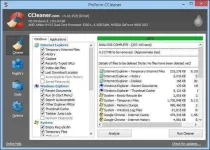
When you first execute CCleaner, it opens up to the “Cleaner” screen, which allows you to clean up your system such as browser cache files, recently used items, and also clear things related to specific “Applications” such as cache and log files.
When you click “Analyze” all the stuff on your system that can be deleted will be displayed. If you don’t want to delete something, then you can uncheck it. Otherwise click “Run Cleaner” to scour your system clean. In this example, when we clicked the cleaner, we were able to clear up about 4 gigabytes of drive space!
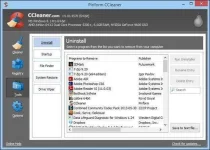
What we’re really interested here is the “Tools” functions, specifically “Uninstall” and “Startup.” On the “Uninstall” pane, you can bypass the “Programs and Features” control panel altogether and uninstall stuff here. Simply click the item you want to remove and click “Run Uninstaller” to begin the removal process.
Moving to the “Startup” tools, we see we have the same kind of options as in “Sysconfig” and the “Task Manager.” You can disable/enable anything by selecting the item or items (hold the “CTRL” button to select multiple items), then click “Disable.”
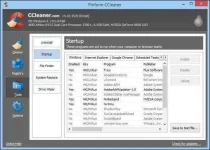
While this method isn’t as informative as the Task Manager’s with its “Startup Impact,” it’s just as effective, and puts everything in one place. If you want a more extensive tour of CCleaner’s features, then we urge you to You do not have permission to view the full content of this post. Log in or register now..
Disk maintenance
Disk maintenance is kind of a misnomer. You don’t really need to “maintain” anything and in fact, your computer will likely do a lot of stuff automatically to keep you disks running optimally. Nevertheless, we feel you should educate yourselves on how disk drives work, and what you can do to extend their life.
SSD vs. HDD
Today, hard drives in computers come in two flavors: the SSD and HDD. An SSD or solid state drive, is sort of a container full of flash memory. Basically it’s RAM, but unlike RAM, the content in an SSD retain their contents after you turn off the power.
Hard drives by contrast, are comprised of quickly spinning platters, on which all the data in your computer is written. To find and retrieve the data, a hard drive has heads, which read the surface of these platters kind of like you might walk to the stacks in a library and retrieve a book or books from their shelves.
SSDs, because they’re so similar to RAM, are superior to old school spinning hard drives because they’re consistently faster at accessing and retrieving data. In other words, when you load an application from an SSD, you don’t need to wait for the head to find and read the data on spinning platters, it’s just there and the only delay you might experience is the time it takes for the SSD to read its contents and store it in the computer’s memory.
Do you need to defrag?
The thing about HDDs is that over time, the books you take off the shelf are replaced by other books, any books your want to return to the stacks are stuck wherever there is space. So instead of having all your data in contiguous chunks, it ends up spread about or “fragmented.” Over time, it becomes increasingly more time consuming to retrieve your data because the hard drive has to read part of it from one area on the platter(s) and another part of it somewhere else.
Defragmenting software is meant to take all those books and put them back together on their shelves so the computer can find them again more efficiently. This works to great effect on traditional spinning platter drives, but not so much on solid state drives, and can actually decrease the lifespan of your SSD.
You can only write to an SSD a finite number of times. Over the course of time, it will lose its ability to hold on to the data and go bad. When you defrag, it reads data scattered about your hard drive, stores it in RAM, and then deposits it where it needs to be. If necessary, it will read data that is stored in the wrong place and deposit in another empty space on the drive in order to put all the data back together.
Doing this, as you can imagine, means that the drive is read and written more than with normal use and as such, defragging effectively shortens the life of an SSD by unnecessarily writing data to the drive. In truth, you don’t even need to defrag an SSD because of the way they work.
How to Defrag
Defragmenting your drive is easy and the computer likely already does it for you around once a week. Still, if you use your computer a lot and do a lot of things where you’re copying many files to and from the hard drive, then you may see some fragmentation. And while we don’t think it will be enough to really slow your system down, you can still initiate a manual defrag anytime you want though to be honest, it’s not as much fun as the animated defragmenter on Windows 9x.
You can launch the defragmenter in Windows 7:
All Programs -> Accessories -> System Tools -> Disk Defragmenter
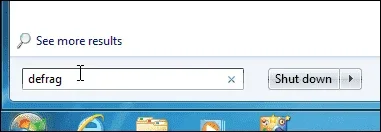
Or simply click on the “Start” button and type “defrag” in the search box.
Similarly, the fastest way to open the defragmenter in Windows 8.x is to hit the “WIN” button and type “defrag.”
One of the best ways to unburden your computer and quickly free up resources, is to disable items that automatically launch when Windows boots. These startup items not only suck up system resources like little vampires, they also often cause your computer to boot longer.
The old school way to deal with startup items is to use the “System Configuration” (“SysConfig”) utility on Windows 7. Launch a “Run” window by typing “WIN + R” and then “msconfig.”
On the “System Configuration” utility, select the “Startup” tab. You do want to exercise some caution here. While you won’t break your system by disabling everything, you may disable some programs that are genuinely useful, like Dropbox.
In the preceding screenshot, there’s not a whole lot to pore over because it was taken on a virtual machine that has the bare minimum of programs installed. Regardless, to disable a startup program, uncheck the box next to it, and restart your system.
Let’s look at our Windows 8.x setup to see a more useful example. If you try to use “Sysconfig” on Windows 8.x, it will simply redirect you to the “Task Manager,” which can be more easily accessed by going directly to it either from the Taskbar:
Or simply hit “WIN” and type “task” and it should appear as the top search result:
It’s worth noting that you can also use the CTRL + SHIFT + ESC shortcut key combination to bring up Task Manager without clicking anywhere.
When the “Task Manager” opens, select the “Startup” tab and behold the glory of your computer’s burdens. You can see your startup items, their status, and the impact they have on your system. You can sort them of course, by clicking the headers. In the following screenshot, we’ve sorted by “Startup impact.”
If you’re unsure what does what, you can right-click on any item and selet “Search online” to find out exactly what something is and what it does.
According to Microsoft, impact is based on how much CPU and disk usage occurs at startup:
- High impact – Apps that use more than 1 second of CPU time or more than 3 MB of disk I/O at startup
- Medium impact – Apps that use 300 ms – 1000 ms of CPU time or 300 KB – 3 MB of disk I/O
- Low impact – Apps that use less than 300 ms of CPU time and less than 300 KB of disk I/O
Microsoft You do not have permission to view the full content of this post. Log in or register now. on how to deal with several categories of startup apps, including utilities that sync your PC or for backup and recovery, updaters, notifiers, and more.
It’s safe to say that in any event, you can disable most, if not all startup items and it will not adversely affect your system. That said, as we mentioned earlier, if you do disable everything, you may lose functionality that you otherwise wanted. In the above case, if we disabled “Dropbox” it would no longer start automatically and sync changes. We’d instead have to manually start it, so we might as well leave it enabled.
Disk Cleanup
The “Disk Cleanup” utility is a very simple tool that allows you quickly delete stuff like temporary and cache files so you can free up space on your hard drive(s).
In Windows 7 you can open it from Start -> All Programs -> Accessories -> System Tools.
In Windows 8.x, you have several options. The easiest is to hit the “WIN” key and type “disk cleanup” and then choose “Free up disk space by deleting unnecessary files.”
When “Disk Cleanup” begins, if you have more than one drive installed, you will need to choose the one you want to cleanup first. Here in our example, we choose the system drive (C
.The “Disk Cleanup” tool will let you scroll through and see what is taking up space. You can read a brief description of what it is you’d be deleting. You can also view the files at any time by clicking on the “View Files” button, or if you have administrative access, you can click “Clean up system files” and the “Disk Cleanup” tool will restart in admin mode.
Note here in the following screenshot, we’ve restarted in administrative cleanup mode and “Disk Cleanup” has found another 500 MB of space it can free up (Windows Update files). This will give us 455 MB versus 90 MB in non-admin mode.
Note also, in admin mode you gain another tab named “More Options,” which gives us further ways to free up valuable disk space. Of particular note here is the “System Restore and Shadow Copies” option, which deletes all but the most recent “system restore” points. If you’ve been using your computer for a while and you’ve never cleaned out your restore points, this option can sometimes free up gigabytes of space without adversely affecting your computer – assuming everything is running smoothly at the moment so you don’t need to roll back any recent changes.
Note also, the “Programs and Features” clean up button. If you click this, it will open the “Programs and Features” control panel, which will let you uninstall unnecessary and unused applications, which we’re going to now talk about in the next section.
Uninstalling Applications and Freeing up Disk Space
Let’s say that you disable something in your startup items, but then you realize that you don’t really use that program. In that case, why not just uninstall it? That way, not only do you remove the startup item, but the whole useless application, thus freeing up disk space in the process.
On Windows 7 and Windows 8.x, removing an application is accomplished by opening the “Programs and Features” control panel. On Windows 7, open the Control Panel from the “Start” menu.
On Windows 8.x, you can access the “Programs and Features” control panel directly by right-clicking on the “Start” button and selecting it from the context menu.
With the “Programs and Features” control panel open, you can click on the application you want to uninstall.
In the above example, we see that from the previous section that Google Drive has a high impact on startup, and since we use Dropbox as our primary cloud service, we can just remove Drive and use it when we need to through the web interface.
The approach you take to this is completely up to you. You may decide you want to just disable the startup program or remove the whole shebang. That said, there’s an even easier way to do all this.
Using CCleaner
You do not have permission to view the full content of this post. Log in or register now. is a free program from Piriform software that takes the work out of cleaning up your computer. Make sure that you download the “Slim” installer version that doesn’t contain any toolbars or other crapware. Yeah, it’s ironic that a software named “crap cleaner” actually distributes more crapware by default, but as long as you don’t download the wrong version you’ll be fine. And it is otherwise a good piece of software.
When you first execute CCleaner, it opens up to the “Cleaner” screen, which allows you to clean up your system such as browser cache files, recently used items, and also clear things related to specific “Applications” such as cache and log files.
When you click “Analyze” all the stuff on your system that can be deleted will be displayed. If you don’t want to delete something, then you can uncheck it. Otherwise click “Run Cleaner” to scour your system clean. In this example, when we clicked the cleaner, we were able to clear up about 4 gigabytes of drive space!
What we’re really interested here is the “Tools” functions, specifically “Uninstall” and “Startup.” On the “Uninstall” pane, you can bypass the “Programs and Features” control panel altogether and uninstall stuff here. Simply click the item you want to remove and click “Run Uninstaller” to begin the removal process.
Moving to the “Startup” tools, we see we have the same kind of options as in “Sysconfig” and the “Task Manager.” You can disable/enable anything by selecting the item or items (hold the “CTRL” button to select multiple items), then click “Disable.”
While this method isn’t as informative as the Task Manager’s with its “Startup Impact,” it’s just as effective, and puts everything in one place. If you want a more extensive tour of CCleaner’s features, then we urge you to You do not have permission to view the full content of this post. Log in or register now..
Disk maintenance
Disk maintenance is kind of a misnomer. You don’t really need to “maintain” anything and in fact, your computer will likely do a lot of stuff automatically to keep you disks running optimally. Nevertheless, we feel you should educate yourselves on how disk drives work, and what you can do to extend their life.
SSD vs. HDD
Today, hard drives in computers come in two flavors: the SSD and HDD. An SSD or solid state drive, is sort of a container full of flash memory. Basically it’s RAM, but unlike RAM, the content in an SSD retain their contents after you turn off the power.
Hard drives by contrast, are comprised of quickly spinning platters, on which all the data in your computer is written. To find and retrieve the data, a hard drive has heads, which read the surface of these platters kind of like you might walk to the stacks in a library and retrieve a book or books from their shelves.
SSDs, because they’re so similar to RAM, are superior to old school spinning hard drives because they’re consistently faster at accessing and retrieving data. In other words, when you load an application from an SSD, you don’t need to wait for the head to find and read the data on spinning platters, it’s just there and the only delay you might experience is the time it takes for the SSD to read its contents and store it in the computer’s memory.
Do you need to defrag?
The thing about HDDs is that over time, the books you take off the shelf are replaced by other books, any books your want to return to the stacks are stuck wherever there is space. So instead of having all your data in contiguous chunks, it ends up spread about or “fragmented.” Over time, it becomes increasingly more time consuming to retrieve your data because the hard drive has to read part of it from one area on the platter(s) and another part of it somewhere else.
Defragmenting software is meant to take all those books and put them back together on their shelves so the computer can find them again more efficiently. This works to great effect on traditional spinning platter drives, but not so much on solid state drives, and can actually decrease the lifespan of your SSD.
You can only write to an SSD a finite number of times. Over the course of time, it will lose its ability to hold on to the data and go bad. When you defrag, it reads data scattered about your hard drive, stores it in RAM, and then deposits it where it needs to be. If necessary, it will read data that is stored in the wrong place and deposit in another empty space on the drive in order to put all the data back together.
Doing this, as you can imagine, means that the drive is read and written more than with normal use and as such, defragging effectively shortens the life of an SSD by unnecessarily writing data to the drive. In truth, you don’t even need to defrag an SSD because of the way they work.
How to Defrag
Defragmenting your drive is easy and the computer likely already does it for you around once a week. Still, if you use your computer a lot and do a lot of things where you’re copying many files to and from the hard drive, then you may see some fragmentation. And while we don’t think it will be enough to really slow your system down, you can still initiate a manual defrag anytime you want though to be honest, it’s not as much fun as the animated defragmenter on Windows 9x.
You can launch the defragmenter in Windows 7:
All Programs -> Accessories -> System Tools -> Disk Defragmenter
Or simply click on the “Start” button and type “defrag” in the search box.
Similarly, the fastest way to open the defragmenter in Windows 8.x is to hit the “WIN” button and type “defrag.”