 PH
gnourt0307
Leecher
Hi guys, today I'd like to share my experience with SproutGigs, a microtask platform where you can earn some extra money by completing simple online tasks.
I've been using SproutGigs since 2022, and it's become one of my favorite ways to make a little extra cash during my free time.
You won't get rich from it, but if you're looking for something simple to do in your spare time without needing any special skills, it might be worth checking out.
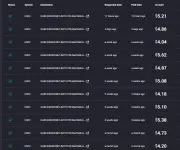
Personally, I've been able to withdraw my earnings regularly, usually once every 2–3 days.
Here's my withdrawal history:
In this guide, I'll walk you through everything I've learned, including how to register, set up your account, find easy tasks, avoid common mistakes, and withdraw your earnings.
1. What Is SproutGigs?
SproutGigs is an online marketplace that connects employers with freelancers who complete small digital tasks.
Most tasks are straightforward and don't require any professional experience.
Some common examples include:
Most of the tasks I encounter take around 30 seconds to 2 minutes to complete.
In my experience, regular tasks usually pay around $0.03–$0.07 each. Some higher-paying tasks, such as replying emails, may offer $0.10–$0.20.
Of course, your actual earnings will depend on task availability, your location, the time you spend working, and your approval rate.
2. How to Create a SproutGigs Account
First, visit the official website:
Registration link: You do not have permission to view the full content of this post. Log in or register now.
Click Sign Up and create your account using your real information and an email address you can access.
Important: I recommend using only one account and avoiding VPNs, proxies, or frequently switching between different networks.
From my experience, using a stable internet connection, preferably your home network, can help reduce unnecessary account security issues.
Avoid creating multiple accounts or using false information, as these actions may violate the platform's rules.
3. Complete Your Profile
After registering, go to the Profile section and complete your personal information.
Make sure all information is accurate, especially your name and address, since you may need to verify your identity before withdrawing your earnings.
Enter your address in English, including your house number, street, city, postal code, and country.
For example:
[House Number], [Street Name], [City], [State/Province], [Country], [Postal Code]
Use your actual address rather than copying someone else's information.
4. Set Up Account Security
Next, open the Security section.
Set up your security question and answer, then enable Two-Factor Authentication (2FA).
I strongly recommend enabling 2FA to keep your account secure.
Save your recovery information somewhere safe so you don't lose access to your account.
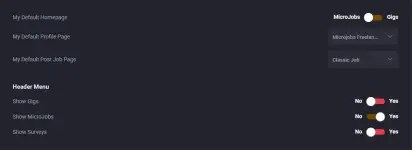
5. Change Your Default Homepage to Microjobs
When you first create an account, SproutGigs may display the Gigs section as your default homepage.
Personally, I prefer working on Microjobs because the tasks are usually quick and easy to complete.
To change your homepage:
Go to Account Settings.
After that, you'll be taken directly to the Microjobs section whenever you open your homepage.
6. Understanding the Task Submission Timer
This is something beginners should pay attention to.
When you first start working on SproutGigs, you may notice a countdown timer near the clock icon.
New accounts may initially have a waiting period of approximately 180 seconds between task submissions.
The timer has worked as follows:
Approved task: waiting time decreases by 10 seconds.
Rejected task: waiting time increases by 20 seconds.
Submission flagged as spam: waiting time increases by 60 seconds.
Always read the employer's instructions carefully and submit genuine, task-specific proof.
Avoid submitting incomplete, irrelevant, or misleading information just to finish a task faster.

7. How Much Can You Earn Per Task?
Different tasks offer different rewards.
Here are the approximate amounts I've personally encountered:
Task Type Typical Reward
SEO tasks $0.03–$0.05
YouTube-related tasks $0.05–$0.07
Social media tasks $0.02–$0.05
Email-related tasks $0.10–$0.20
Some tasks can be completed in less than a minute, while others may take several minutes depending on their requirements.
I personally prefer simple tasks that don't require complicated registration procedures or excessive personal information.
8. Understanding Task Approval and Success Rate
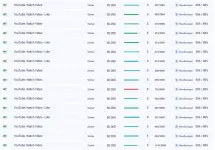
When you complete a task, the employer usually has a certain period to review your submission.
Approval periods commonly range from 1 to 7 days. Tasks that aren't reviewed within their specified approval period are automatically approved.
For beginners, I recommend starting with tasks that have shorter approval periods, preferably around 1–2 days.
Why?
Because your account's success rate is important.
If you complete a large number of tasks that are still pending approval, your displayed success rate may temporarily decrease.
When you have submitted the first 60 tasks, your success rate drops below 75%, the platform restricts you from accepting additional tasks until more submissions are approved and the success rate reaches above 75% again.
That's why I suggest doing tasks that only take 1 - 2 days to be approved at first.
Also, some employer names may appear hidden behind a lock icon when your account is new.
As your account progresses, additional information may become visible, although certain task categories can still hide employer details.
9. How to Withdraw Money from SproutGigs
Now let's talk about the most important part: getting ρáíd.
Based on my experience, the minimum withdrawal amounts have been:
Level 1 to 3: $10
After the level 3 the min is: $5
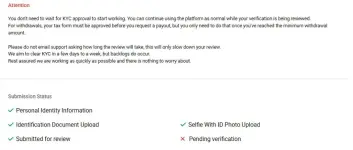
Before making your first withdrawal, you may need to complete identity verification (KYC).
This typically involves submitting identification documents, a selfie for verification, and the required tax information.
Only submit your documents through the official SproutGigs verification process.
After verification, you can choose from the withdrawal methods currently available to your account.
I've personally used USDC cryptocurrency withdrawals, usually through Binance.
PayPal may also be available, depending on your location and the platform's supported payment methods.
If you're using PayPal, make sure your account information is consistent with SproutGigs' withdrawal requirements.
Important note about fees:
In my experience, SproutGigs has applied a fee of 20% to withdrawals, if you use LTC coin to withdraw, its gonna take 24$ so I don't suggest withdrawing through LTC coin.
For example, a $10 withdrawal with a 20% fee would leave you with approximately $8.
Actual fees and available withdrawal methods can change, so always check the current withdrawal page before confirming a transaction.
10. My Recommended SproutGigs Employers
This is probably one of the most useful parts of my guide.
After completing many tasks and learning from both successful and unsuccessful submissions, I've put together a list of employers I personally like to follow.
In my experience, these employers have offered relatively straightforward tasks with clear requirements.
Of course, task availability and approval quality can change over time, so always check the latest instructions and reviews yourself.
Here is my list:
You do not have permission to view the full content of this post. Log in or register now.
You do not have permission to view the full content of this post. Log in or register now.
You do not have permission to view the full content of this post. Log in or register now.
You do not have permission to view the full content of this post. Log in or register now.
You do not have permission to view the full content of this post. Log in or register now.
You do not have permission to view the full content of this post. Log in or register now.
You do not have permission to view the full content of this post. Log in or register now.
You do not have permission to view the full content of this post. Log in or register now.
You do not have permission to view the full content of this post. Log in or register now.
You do not have permission to view the full content of this post. Log in or register now.
You do not have permission to view the full content of this post. Log in or register now.
You do not have permission to view the full content of this post. Log in or register now.
You do not have permission to view the full content of this post. Log in or register now.
You do not have permission to view the full content of this post. Log in or register now.
You do not have permission to view the full content of this post. Log in or register now.
You do not have permission to view the full content of this post. Log in or register now.
You do not have permission to view the full content of this post. Log in or register now.
You do not have permission to view the full content of this post. Log in or register now.
You do not have permission to view the full content of this post. Log in or register now.
11. How to Follow Employers and Find Their Tasks
Here's a simple trick I use to find tasks more efficiently.
First, open any employer profile from the list above.
Go to the Micro Buying section and click Follow Buyer.
Repeat this for the employers you're interested in.
Once you've followed them:
Browse the available tasks, including the Featured Tasks section.
This makes it easier to find new jobs posted by employers you're already familiar with.
I also recommend switching to List View, since it makes comparing tasks and their rewards much easier.
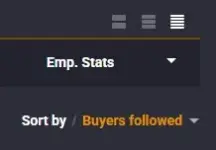
This simple setup has helped me save time instead of browsing through hundreds of unfamiliar tasks.
12. Additional Task Tutorials and Resources
Besides this guide, I've also been collecting more detailed tutorials explaining how to complete different types of SproutGigs tasks.
Some employers have very specific requirements, and understanding their instructions before starting can save you a lot of time.
I've organized these tutorials into a shared resource folder.
My task tutorial collection:
You do not have permission to view the full content of this post. Log in or register now.
You can browse the guides, learn how different tasks work, and become more familiar with their requirements before submitting anything.
I'll continue updating the collection whenever I discover useful new tasks or better ways to complete them accurately.
If you're completely new to SproutGigs, I hope this guide helps you avoid some of the mistakes I made when I first started.
Feel free to leave a comment if you have questions or want to share your own experience.
Thanks for reading, and good luck with your microtasks!
I've been using SproutGigs since 2022, and it's become one of my favorite ways to make a little extra cash during my free time.
You won't get rich from it, but if you're looking for something simple to do in your spare time without needing any special skills, it might be worth checking out.
Personally, I've been able to withdraw my earnings regularly, usually once every 2–3 days.
Here's my withdrawal history:
In this guide, I'll walk you through everything I've learned, including how to register, set up your account, find easy tasks, avoid common mistakes, and withdraw your earnings.
1. What Is SproutGigs?
SproutGigs is an online marketplace that connects employers with freelancers who complete small digital tasks.
Most tasks are straightforward and don't require any professional experience.
Some common examples include:
- Visiting websites and completing simple actions.
- Watching YouTube videos.
- Following or interacting with social media accounts.
- Completing search engine-related tasks.
- Responding to emails.
Most of the tasks I encounter take around 30 seconds to 2 minutes to complete.
In my experience, regular tasks usually pay around $0.03–$0.07 each. Some higher-paying tasks, such as replying emails, may offer $0.10–$0.20.
Of course, your actual earnings will depend on task availability, your location, the time you spend working, and your approval rate.
2. How to Create a SproutGigs Account
First, visit the official website:
Registration link: You do not have permission to view the full content of this post. Log in or register now.
Click Sign Up and create your account using your real information and an email address you can access.
Important: I recommend using only one account and avoiding VPNs, proxies, or frequently switching between different networks.
From my experience, using a stable internet connection, preferably your home network, can help reduce unnecessary account security issues.
Avoid creating multiple accounts or using false information, as these actions may violate the platform's rules.
3. Complete Your Profile
After registering, go to the Profile section and complete your personal information.
Make sure all information is accurate, especially your name and address, since you may need to verify your identity before withdrawing your earnings.
Enter your address in English, including your house number, street, city, postal code, and country.
For example:
[House Number], [Street Name], [City], [State/Province], [Country], [Postal Code]
Use your actual address rather than copying someone else's information.
4. Set Up Account Security
Next, open the Security section.
Set up your security question and answer, then enable Two-Factor Authentication (2FA).
I strongly recommend enabling 2FA to keep your account secure.
Save your recovery information somewhere safe so you don't lose access to your account.
5. Change Your Default Homepage to Microjobs
When you first create an account, SproutGigs may display the Gigs section as your default homepage.
Personally, I prefer working on Microjobs because the tasks are usually quick and easy to complete.
To change your homepage:
Go to Account Settings.
- Scroll down to My Default Homepage
- Select Microjobs.
- Save your changes.
After that, you'll be taken directly to the Microjobs section whenever you open your homepage.
6. Understanding the Task Submission Timer
This is something beginners should pay attention to.
When you first start working on SproutGigs, you may notice a countdown timer near the clock icon.
New accounts may initially have a waiting period of approximately 180 seconds between task submissions.
The timer has worked as follows:
Approved task: waiting time decreases by 10 seconds.
Rejected task: waiting time increases by 20 seconds.
Submission flagged as spam: waiting time increases by 60 seconds.
Always read the employer's instructions carefully and submit genuine, task-specific proof.
Avoid submitting incomplete, irrelevant, or misleading information just to finish a task faster.
7. How Much Can You Earn Per Task?
Different tasks offer different rewards.
Here are the approximate amounts I've personally encountered:
Task Type Typical Reward
SEO tasks $0.03–$0.05
YouTube-related tasks $0.05–$0.07
Social media tasks $0.02–$0.05
Email-related tasks $0.10–$0.20
Some tasks can be completed in less than a minute, while others may take several minutes depending on their requirements.
I personally prefer simple tasks that don't require complicated registration procedures or excessive personal information.
8. Understanding Task Approval and Success Rate
When you complete a task, the employer usually has a certain period to review your submission.
Approval periods commonly range from 1 to 7 days. Tasks that aren't reviewed within their specified approval period are automatically approved.
For beginners, I recommend starting with tasks that have shorter approval periods, preferably around 1–2 days.
Why?
Because your account's success rate is important.
If you complete a large number of tasks that are still pending approval, your displayed success rate may temporarily decrease.
When you have submitted the first 60 tasks, your success rate drops below 75%, the platform restricts you from accepting additional tasks until more submissions are approved and the success rate reaches above 75% again.
That's why I suggest doing tasks that only take 1 - 2 days to be approved at first.
Also, some employer names may appear hidden behind a lock icon when your account is new.
As your account progresses, additional information may become visible, although certain task categories can still hide employer details.
9. How to Withdraw Money from SproutGigs
Now let's talk about the most important part: getting ρáíd.
Based on my experience, the minimum withdrawal amounts have been:
Level 1 to 3: $10
After the level 3 the min is: $5
Before making your first withdrawal, you may need to complete identity verification (KYC).
This typically involves submitting identification documents, a selfie for verification, and the required tax information.
Only submit your documents through the official SproutGigs verification process.
After verification, you can choose from the withdrawal methods currently available to your account.
I've personally used USDC cryptocurrency withdrawals, usually through Binance.
PayPal may also be available, depending on your location and the platform's supported payment methods.
If you're using PayPal, make sure your account information is consistent with SproutGigs' withdrawal requirements.
Important note about fees:
In my experience, SproutGigs has applied a fee of 20% to withdrawals, if you use LTC coin to withdraw, its gonna take 24$ so I don't suggest withdrawing through LTC coin.
For example, a $10 withdrawal with a 20% fee would leave you with approximately $8.
Actual fees and available withdrawal methods can change, so always check the current withdrawal page before confirming a transaction.
10. My Recommended SproutGigs Employers
This is probably one of the most useful parts of my guide.
After completing many tasks and learning from both successful and unsuccessful submissions, I've put together a list of employers I personally like to follow.
In my experience, these employers have offered relatively straightforward tasks with clear requirements.
Of course, task availability and approval quality can change over time, so always check the latest instructions and reviews yourself.
Here is my list:
You do not have permission to view the full content of this post. Log in or register now.
You do not have permission to view the full content of this post. Log in or register now.
You do not have permission to view the full content of this post. Log in or register now.
You do not have permission to view the full content of this post. Log in or register now.
You do not have permission to view the full content of this post. Log in or register now.
You do not have permission to view the full content of this post. Log in or register now.
You do not have permission to view the full content of this post. Log in or register now.
You do not have permission to view the full content of this post. Log in or register now.
You do not have permission to view the full content of this post. Log in or register now.
You do not have permission to view the full content of this post. Log in or register now.
You do not have permission to view the full content of this post. Log in or register now.
You do not have permission to view the full content of this post. Log in or register now.
You do not have permission to view the full content of this post. Log in or register now.
You do not have permission to view the full content of this post. Log in or register now.
You do not have permission to view the full content of this post. Log in or register now.
You do not have permission to view the full content of this post. Log in or register now.
You do not have permission to view the full content of this post. Log in or register now.
You do not have permission to view the full content of this post. Log in or register now.
You do not have permission to view the full content of this post. Log in or register now.
11. How to Follow Employers and Find Their Tasks
Here's a simple trick I use to find tasks more efficiently.
First, open any employer profile from the list above.
Go to the Micro Buying section and click Follow Buyer.
Repeat this for the employers you're interested in.
Once you've followed them:
- Return to the Microjobs homepage.
- Find the sorting options.
- Select Sort by Buyers Followed.
Browse the available tasks, including the Featured Tasks section.
This makes it easier to find new jobs posted by employers you're already familiar with.
I also recommend switching to List View, since it makes comparing tasks and their rewards much easier.
This simple setup has helped me save time instead of browsing through hundreds of unfamiliar tasks.
12. Additional Task Tutorials and Resources
Besides this guide, I've also been collecting more detailed tutorials explaining how to complete different types of SproutGigs tasks.
Some employers have very specific requirements, and understanding their instructions before starting can save you a lot of time.
I've organized these tutorials into a shared resource folder.
My task tutorial collection:
You do not have permission to view the full content of this post. Log in or register now.
You can browse the guides, learn how different tasks work, and become more familiar with their requirements before submitting anything.
I'll continue updating the collection whenever I discover useful new tasks or better ways to complete them accurately.
If you're completely new to SproutGigs, I hope this guide helps you avoid some of the mistakes I made when I first started.
Feel free to leave a comment if you have questions or want to share your own experience.
Thanks for reading, and good luck with your microtasks!