 PH
PHFor safety browsing ( Anti-Ads )pasok kahit buong angkan niyo pasabitin niyo using dns may guide nadin tyo para di kayo mahirapan both android and windows
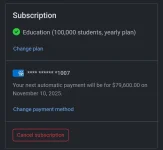
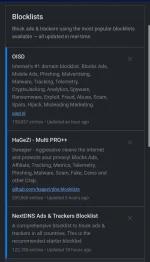
Feedback nalang mga boss
~~KAPE~~
For Android
Private DNS
Android 9 or higher
1. Go to Settings → Network & internet → Advanced → Private DNS.
2. Select the Private DNS provider hostname option.
3. Enter 5581f4.dns.nextdns.io and hit Save.
For Windows
Private DNS
DNS over HTTPS
Windows 11
For Routers IPV6
IPv6
1. Open the preferences for your router. Usually you can access it from your browser via a URL (like You do not have permission to view the full content of this post. Log in or register now. or You do not have permission to view the full content of this post. Log in or register now.).
2. Locate the DNS settings inside the interface.
3. Remove all addresses (if any) then add 2a07:a8c0::55:81f4 and 2a07:a8c1::55:81f4.
4. Click Save (or similar).
Some routers may not support the IPv6 notation above. In that case, use 2a07:a8c0:0000:0000:0000:0000:0055:81f4 and 2a07:a8c1:0000:0000:0000:0000:0055:81f4.
For Routers IPv4
IPv4 (with Linked IP)
1. Open the preferences for your router. Usually you can access it from your browser via a URL (like You do not have permission to view the full content of this post. Log in or register now. or You do not have permission to view the full content of this post. Log in or register now.).
2. Locate the DNS settings inside the interface.
3. Remove all addresses (if any) then add 45.90.28.161 and 45.90.30.161.
4. Click Save (or similar).
Feedback nalang mga boss
~~KAPE~~
For Android
Private DNS
Android 9 or higher
1. Go to Settings → Network & internet → Advanced → Private DNS.
2. Select the Private DNS provider hostname option.
3. Enter 5581f4.dns.nextdns.io and hit Save.
For Windows
Private DNS
DNS over HTTPS
Windows 11
- Open the Settings app.
- Go to Network & internet.
- Click on Wi-Fi (or Ethernet).
- Click on Hardware properties, or ignore this step if you clicked on Ethernet.
- Click the Edit button next to DNS server assignment.
- Select Manual.
- Enable IPv4.
- Enter 45.90.28.0 as Preferred DNS, then select On (manual template) and enter You do not have permission to view the full content of this post. Log in or register now..
- Enter 45.90.30.0 as Alternate DNS, then select On (manual template) and enter You do not have permission to view the full content of this post. Log in or register now..
- Click Save.
For Routers IPV6
IPv6
1. Open the preferences for your router. Usually you can access it from your browser via a URL (like You do not have permission to view the full content of this post. Log in or register now. or You do not have permission to view the full content of this post. Log in or register now.).
2. Locate the DNS settings inside the interface.
3. Remove all addresses (if any) then add 2a07:a8c0::55:81f4 and 2a07:a8c1::55:81f4.
4. Click Save (or similar).
Some routers may not support the IPv6 notation above. In that case, use 2a07:a8c0:0000:0000:0000:0000:0055:81f4 and 2a07:a8c1:0000:0000:0000:0000:0055:81f4.
For Routers IPv4
IPv4 (with Linked IP)
1. Open the preferences for your router. Usually you can access it from your browser via a URL (like You do not have permission to view the full content of this post. Log in or register now. or You do not have permission to view the full content of this post. Log in or register now.).
2. Locate the DNS settings inside the interface.
3. Remove all addresses (if any) then add 45.90.28.161 and 45.90.30.161.
4. Click Save (or similar).


 Maapprove yan