 PH
PHarsenal1205
Rarely opens PHC
You can quickly disable all ads in Windows 11, such as advertisements in File Explorer and on the Lock Screen, suggestions in Settings and on the Desktop, and so on. What Microsoft shows is actually not third-party ads or banners like you see on websites. The Redmond firm is instead promoting its own services and apps. Some notifications may include “fun facts” or suggestions Microsoft considers useful to the end user. But users often find them annoying.
Such ads are nothing new to Windows 11. The OS share a lot of common with its predecessor. It is Windows 10 where Microsoft first introduced such promotional notifications. Along with desktop toasts that show tips and app suggestions, it also included a promotional banner for OneDrive directly in File Explorer.
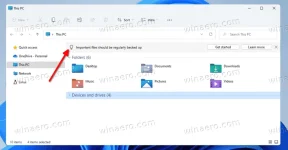
If you are not happy with seeing tips and suggestions in the user interface of the operating system, then carefully follow the steps below.
You may wonder what's actually the "sync provider notifications"? Those notifications display quick and easy tips and suggestions about Windows 11 apps and features you can try to have a better experience with Microsoft's ecosystem.
Alternatively, you can apply a registry tweak.
The next step you may want to take is to disable ads on the Lock Screen. It may periodically show promotional materials. The latter includes games, apps, and services, including ones from Microsoft's partners.
But if you prefer a Registry editing method, here are the files for you.
HKEY_CURRENT_USER\SOFTWARE\Microsoft\Windows\CurrentVersion\ContentDeliveryManager
; To disable ads
"RotatingLockScreenEnabled"=0
"RotatingLockScreenOverlayEnabled"=0
"SubscribedContent-338387Enabled"=0
; defaults (enable ads)
"RotatingLockScreenEnabled"=1
"RotatingLockScreenOverlayEnabled"=1
"SubscribedContent-338387Enabled"=1
All three values are of the DWORD type.
To disable tips and notifications about Windows features, do the following.
The same can be done with a Registry tweak.
Finally, Windows 11 shows suggestions directly in the Settings app, even when the two above options are disabled. You may want to disable them as well.
You can also download You do not have permission to view the full content of this post. Log in or register now. to avoid editing of the Registry manually. Extract them to any folder.
Another thing to disable are suggested apps that Windows 11 installs automatically after you sign-in to your user account. If your device remains connected to the Internet, you will notice that apps like Twitter, Facebook, and similar software are getting downloaded automatically. Here's how to disable them.
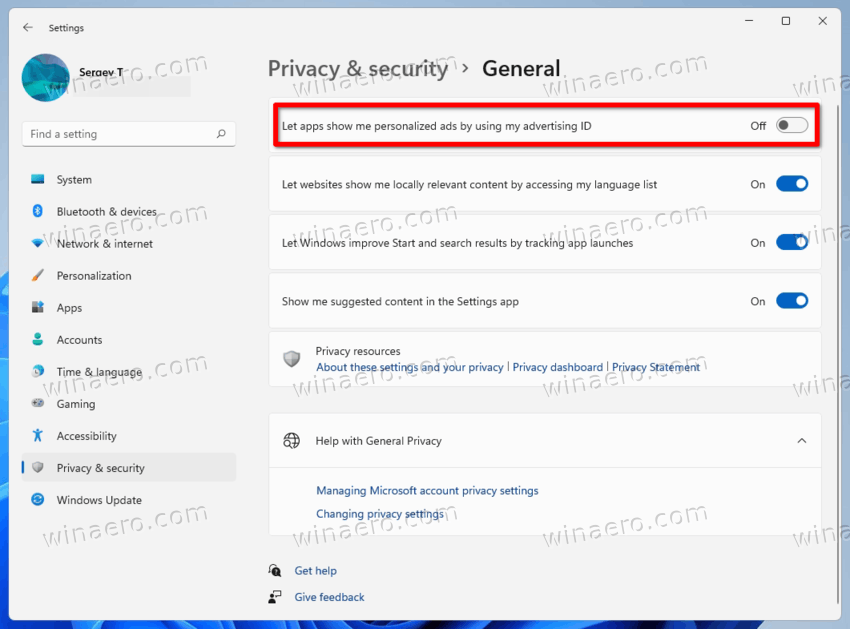
If you are not happy with personalized ads in Windows 11, open the Settings app and open the Privacy & security > General page. On the right, disable the Let apps show me personalized ads by using my Advertising ID option.
Again, you can disable this option in the Registry.
The ready-to-use REG files with this tweak are available You do not have permission to view the full content of this post. Log in or register now..
They are packed into a ZIP archive that you can extract to any folder. After that, open the Disable personalized ads in Windows 11.reg file to apply the change. The other REG file in the archive is an undo tweak.
That's it!
FROM: WINAERO
Such ads are nothing new to Windows 11. The OS share a lot of common with its predecessor. It is Windows 10 where Microsoft first introduced such promotional notifications. Along with desktop toasts that show tips and app suggestions, it also included a promotional banner for OneDrive directly in File Explorer.
If you are not happy with seeing tips and suggestions in the user interface of the operating system, then carefully follow the steps below.
Disable ads in File Explorer
- Open File Explorer; press Win + E or click its icon in the taskbar or Start menu.
- Click on the See more button with 3 dots in the toolbar, and select Options.
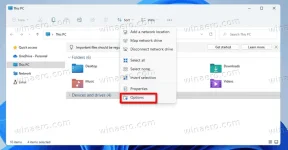
- Switch to the View tab in the Folder Options dialog.
- Remove the check mark from the Show sync provider notifications option to disable ads in File Explorer.
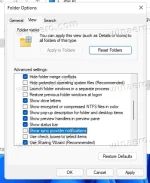
- Click OK in the Folder Options window.
- Re-open File Explorer to make the existing ads disappear.
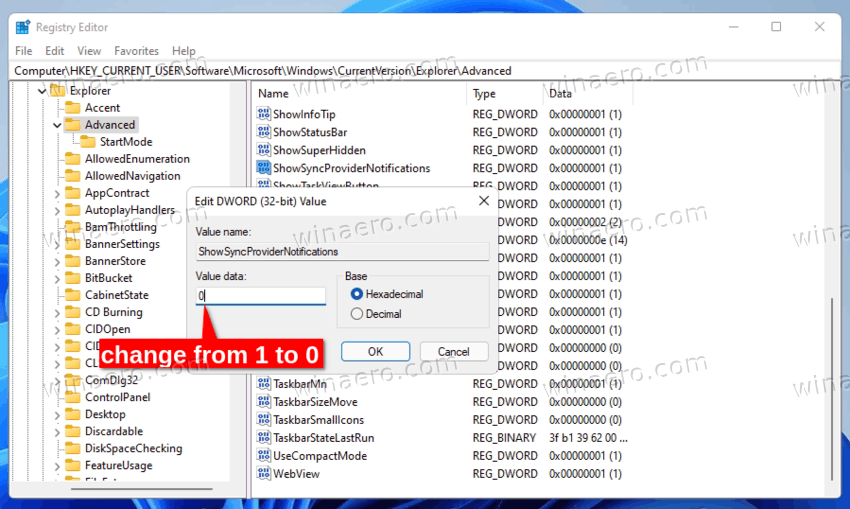
You may wonder what's actually the "sync provider notifications"? Those notifications display quick and easy tips and suggestions about Windows 11 apps and features you can try to have a better experience with Microsoft's ecosystem.
Alternatively, you can apply a registry tweak.
USING A REGISTRY TWEAK
- Download two REG files in a ZIP archive using You do not have permission to view the full content of this post. Log in or register now..
- Extract the REG files to any folder of your choice.
- Now, double-click the Disable_sync_provider_notifications.reg file and confirm the UAC prompt.
- File Explorer will no longer show promotional notifications.
How it works
The above REG files will change the ShowSyncProviderNotifications DWORD value under the HKEY_CURRENT_USER\SOFTWARE\Microsoft\Windows\CurrentVersion\Explorer\Advanced key.- ShowSyncProviderNotifications = 0 - disables notifications.
- ShowSyncProviderNotifications = 1 - File Explorer shows ads (default)
The next step you may want to take is to disable ads on the Lock Screen. It may periodically show promotional materials. The latter includes games, apps, and services, including ones from Microsoft's partners.
Disable ads on the Lock screen in Windows 11
- Press Win + I to open the You do not have permission to view the full content of this post. Log in or register now. app.
- Click Personalization on the left.
- Select Lock screen in the right pane.
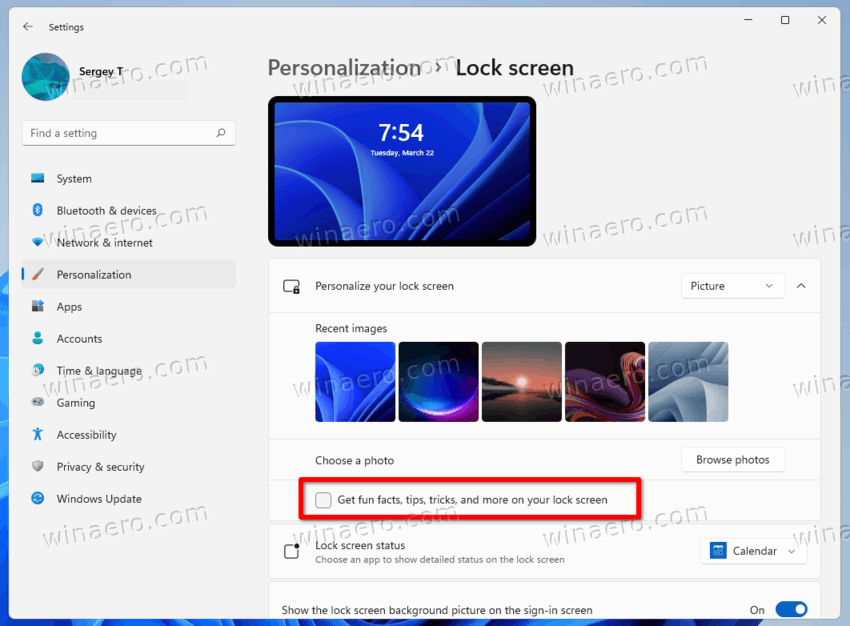
- Finally, uncheck the option Get fun facts, tips, tricks, and more on your lock screen. Note that it is only appears when the You do not have permission to view the full content of this post.
Log in or register now. is set to Picture or Slideshow.
But if you prefer a Registry editing method, here are the files for you.
REGISTRY FILES
- Download this You do not have permission to view the full content of this post. Log in or register now..
- Unpack the REG files to any folder.
- Double-click the file "Disable_ads_on_lock_screen.reg" to get rid of ads on the lock screen in Windows 11.
- The other file, "Enable_ads_on_lock_screen.reg", will re-enable extra lock screen notifications.
HKEY_CURRENT_USER\SOFTWARE\Microsoft\Windows\CurrentVersion\ContentDeliveryManager
; To disable ads
"RotatingLockScreenEnabled"=0
"RotatingLockScreenOverlayEnabled"=0
"SubscribedContent-338387Enabled"=0
; defaults (enable ads)
"RotatingLockScreenEnabled"=1
"RotatingLockScreenOverlayEnabled"=1
"SubscribedContent-338387Enabled"=1
All three values are of the DWORD type.
Disable tips about Windows features
Windows 11 occasionally show tips on how to use this or that feature, like the new Start menu or Quick Settings. They are great if you see Windows 11 for the first time. But if you have some experience with the OS, they are a bit annoying.To disable tips and notifications about Windows features, do the following.
- Open the Settings app with the Start menu shortcut or by pressing Win + I.
- Click System on the left.
- On the right, click on Notifications.
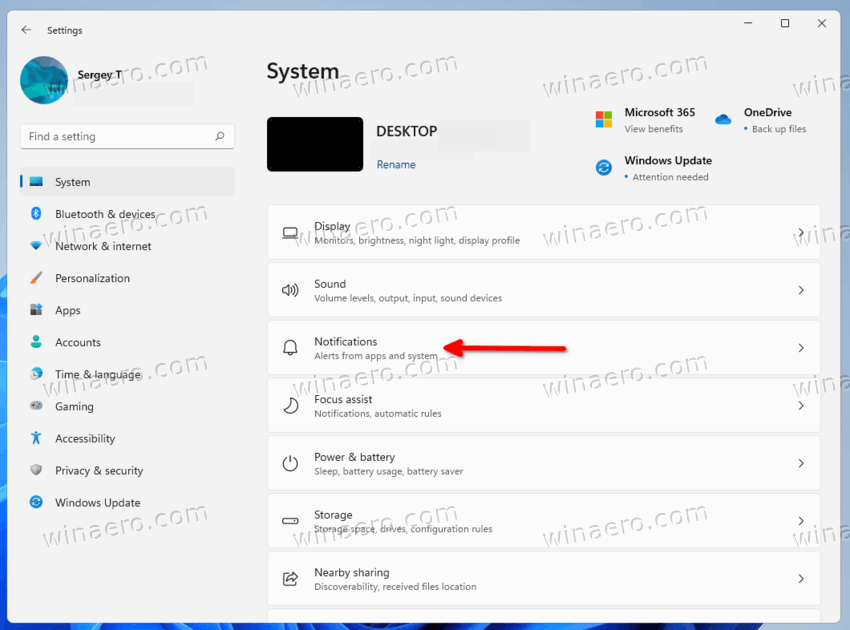
- Scroll down the next page to the Additional settings button and click it.
- Remove the check marks from the Get tips and suggestions when using Windows, Suggest ways to get the most out of Windows and finish setting up this device, and Show me the Windows welcome experience... options. The latter is reviewed in detail in the 'You do not have permission to view the full content of this post.
Log in or register now.' article.
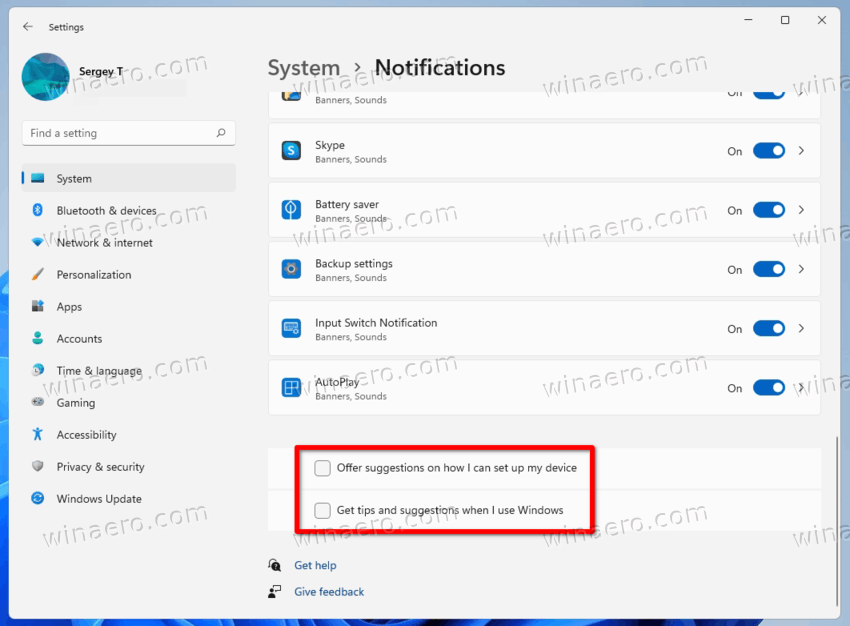
The same can be done with a Registry tweak.
DISABLE WINDOWS TIPS IN THE REGISTRY
You can disable tips about Windows 11 features by changing a couple of DWORD values. For the "Get tips and suggestions when using Windows" option, the corresponding value is SoftLandingEnabled located at the key HKEY_CURRENT_USER\SOFTWARE\Microsoft\Windows\CurrentVersion\ContentDeliveryManager. Set if to one of the following values:- SoftLandingEnabled = 0 - tips are disabled.
- SoftLandingEnabled = 1 - tips are disabled
- ScoobeSystemSettingEnabled = 0 - suggestions are disabled.
- ScoobeSystemSettingEnabled = 1 - suggestions are enabled (default).
Finally, Windows 11 shows suggestions directly in the Settings app, even when the two above options are disabled. You may want to disable them as well.
Disable suggestions in the Settings app
- Open the Settings app using any of the You do not have permission to view the full content of this post. Log in or register now..
- Click on Privacy & security on the left.
- On the right, click on the General section.
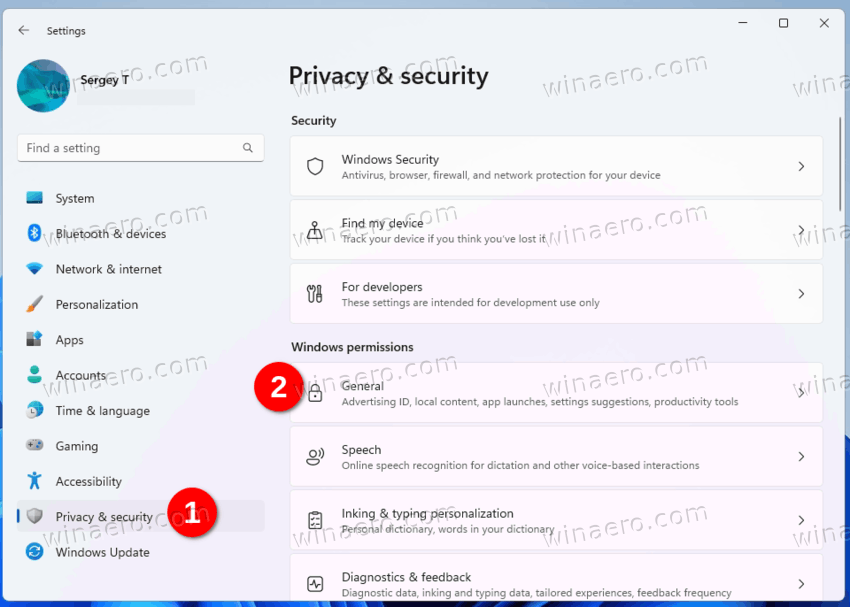
- Finally, on the next page disable the toggle switch from the Show me suggested content in the Settings app option.
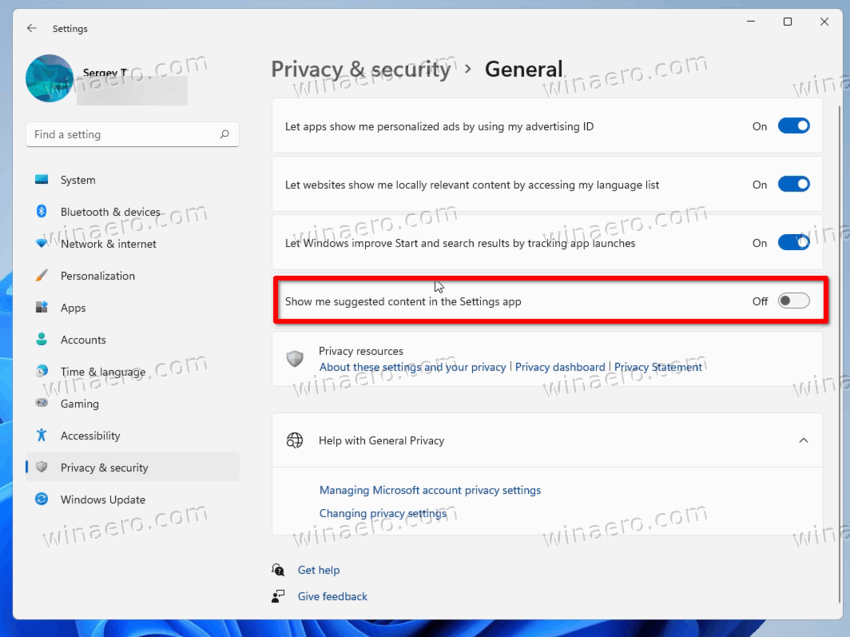
- You can now close the Settings app.
DISABLE SETTINGS APP SUGGESTIONS IN THE REGISTRY
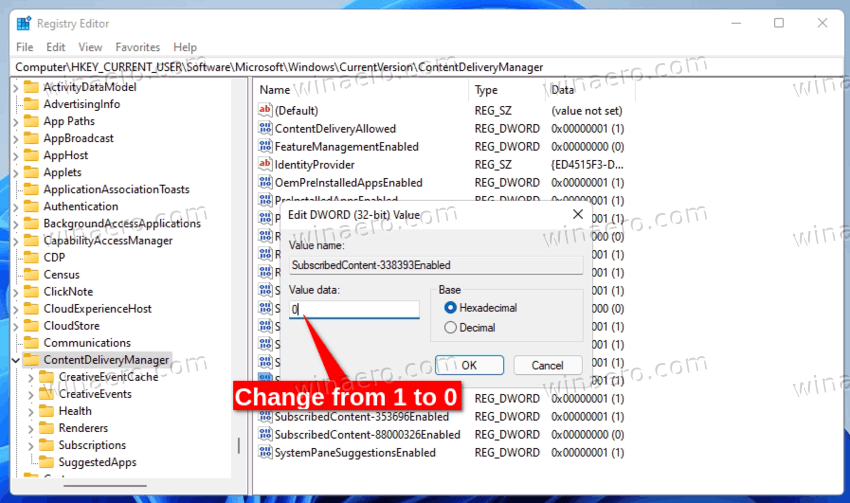
To disable suggestions and tips for the Windows 11 Settings app, In the You do not have permission to view the full content of this post. Log in or register now., visit the HKEY_CURRENT_USER\Software\Microsoft\Windows\CurrentVersion\ContentDeliveryManager key and change the value data for the SubscribedContent-338393Enabled value.- SubscribedContent-338393Enabled = 0 - suggestions in Settings are disabled.
- SubscribedContent-338393Enabled = 1 - enable suggestions in Settings (default).
You can also download You do not have permission to view the full content of this post. Log in or register now. to avoid editing of the Registry manually. Extract them to any folder.
Another thing to disable are suggested apps that Windows 11 installs automatically after you sign-in to your user account. If your device remains connected to the Internet, you will notice that apps like Twitter, Facebook, and similar software are getting downloaded automatically. Here's how to disable them.
Disable automatic installation of apps in Windows 11
- Press Win + R and type regedit into the Run box.
- Open the following key: HKEY_CURRENT_USER\Software\Microsoft\Windows\CurrentVersion\ContentDeliveryManager.
- Now, create or modify the 32-bit DWORD value SilentInstalledAppsEnabled.
- Set its value data to 0.
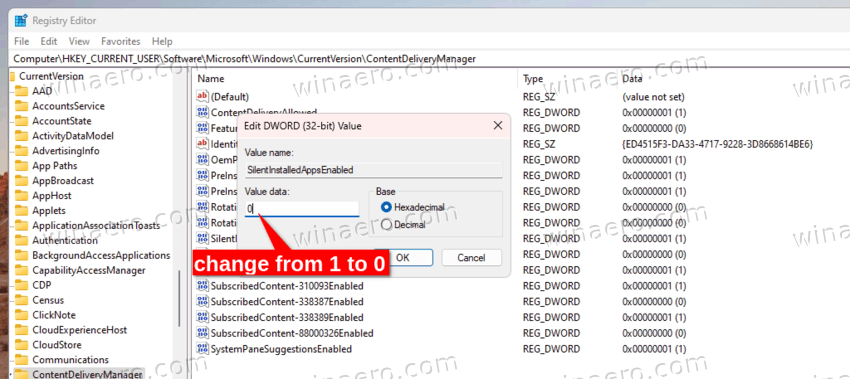
- You do not have permission to view the full content of this post. Log in or register now. to apply the change.
DOWNLOAD REG FILES
To save your time, you can download You do not have permission to view the full content of this post. Log in or register now.. Extract the downloaded ZIP archive and double-click the REG file.- Disable_automatically_installing_apps.reg - prevents Windows 11 from auto-installing apps.
- Enable_automatically_installing_apps.reg - restores the defaults.
Disable personalized ads in Windows 11 apps
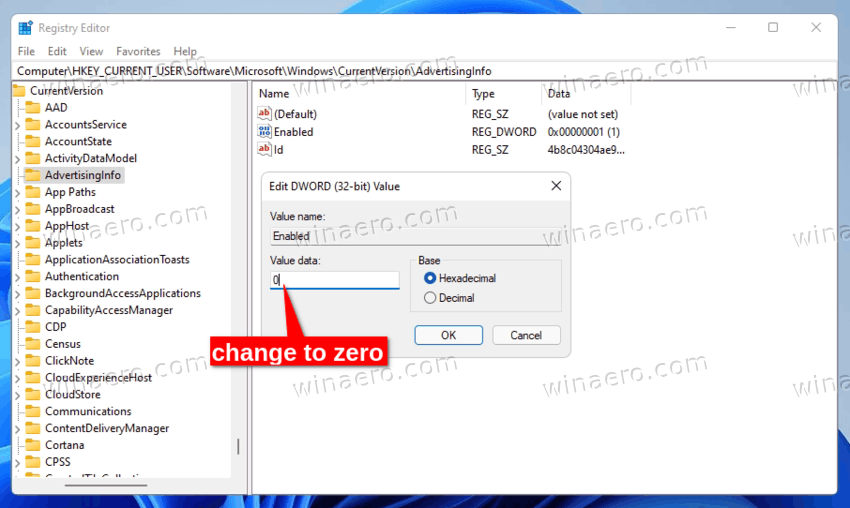
Finally, you can disable personalized ads in all Store apps. By default, Windows generates a unique identifier for your user account. Apps can use it to associate it with your preferences, searches and other personal data. The collected information can be used for ad targeting, i.e. to show ads that match your interests.If you are not happy with personalized ads in Windows 11, open the Settings app and open the Privacy & security > General page. On the right, disable the Let apps show me personalized ads by using my Advertising ID option.
Again, you can disable this option in the Registry.
THE REGISTRY EDITOR METHOD
Open the Registry editor (regedit.exe) and go to the HKEY_CURRENT_USER\Software\Microsoft\Windows\CurrentVersion\AdvertisingInfo key. In the right pane, change the 32-bit DWORD value Enabled.- Enabled = 0 - disable personalized ads.
- Enabled = 1 - enable personalized ads (default).
The ready-to-use REG files with this tweak are available You do not have permission to view the full content of this post. Log in or register now..
They are packed into a ZIP archive that you can extract to any folder. After that, open the Disable personalized ads in Windows 11.reg file to apply the change. The other REG file in the archive is an undo tweak.
That's it!
FROM: WINAERO
 potek talaga