PH
PHPara ito sa mga GIGASTORIES Promo users, tapos ayaw sa OVPN only sa modem.
Requirements:
1.2. Download and Install TunnelHub to your modem, and Download HTTP Injector to your Android.
1.1. Run You do not have permission to view the full content of this post. Log in or register now. for completing installation, you can custom username and password or just default user/pass: admin.
1.2. After you proceed the "Finish installation" and prepare to run You do not have permission to view the full content of this post. Log in or register now. for further step.
2. Download from ovpn config from config makers, and open it with notepad.
3. Copy from the line "http-proxy <ip-address>" and the payload like "p16-sg.tiktokcdn.com" from "http-proxy-option CUSTOM-HEADER", don't forget copy username and password.
3.1. Delete the line...
This ovpn config should be different BEFORE and AFTER after you delete the lines:
Difference from delete:
- Remove username and password from config into "auth-user-pass"
BEFORE:
AFTER:
4. Open HTTP Injector and Go to Payload Generator feature: (OK) means Check it!
Fill uo Payload from the OVPN Config that you copied
(OK) Online-Host
(OK) Forward-Host
(OK) Keep-Alive
(OK) Referrer
Then "Generate"
Copy Payload and....
4. Run You do not have permission to view the full content of this post. Log in or register now. to your browser and input username and password.
5. Go to "Settings" and do it as per tab.
OPENVPN:
HTTP:
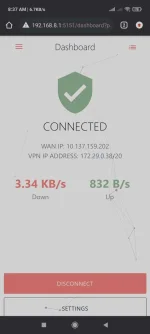
6. Back to Dashboard and test it for success connection..
Requirements:
- TunnelHub(by Ragnverdnr): https://phcorner.org/threads/the-new-openvpn-with-http-injector-modem.1025225/
- OVPN Config from Config Makers
- Notepad, or any note editors
- HTTP Injector, or any VPN App with Payload Generator
- Debranded Huawei Modems like B315-936, B310As-938, B525-65a
1.2. Download and Install TunnelHub to your modem, and Download HTTP Injector to your Android.
1.1. Run You do not have permission to view the full content of this post. Log in or register now. for completing installation, you can custom username and password or just default user/pass: admin.
1.2. After you proceed the "Finish installation" and prepare to run You do not have permission to view the full content of this post. Log in or register now. for further step.
2. Download from ovpn config from config makers, and open it with notepad.
3. Copy from the line "http-proxy <ip-address>" and the payload like "p16-sg.tiktokcdn.com" from "http-proxy-option CUSTOM-HEADER", don't forget copy username and password.
3.1. Delete the line...
This ovpn config should be different BEFORE and AFTER after you delete the lines:
Difference from delete:
- Remove username and password from config into "auth-user-pass"
BEFORE:
client
dev tun
persist-tun
proto tcp
remote <ip-address> <port>
http-proxy <ip-address> <port>
persist-remote-ip
resolv-retry infinite
connect-retry 0 1
remote-cert-tls server
nobind
reneg-sec 0
keysize 0
rcvbuf 0
sndbuf 0
verb 2
comp-lzo
auth none
auth-nocache
cipher none
setenv CLIENT_CERT 0
allow-compression yes
<auth-user-pass>
username
password
</auth-user-pass>
http-proxy-option VERSION 1.1
http-proxy-option AGENT Chrome/80.0.3987.87
http-proxy-option CUSTOM-HEADER "Host: <payload>"
http-proxy-option CUSTOM-HEADER "X-Online-Host: <payload>"
http-proxy-option CUSTOM-HEADER "X-Forward-Host: <payload>"
http-proxy-option CUSTOM-HEADER "Connection: Keep-Alive"
AFTER:
client
dev tun
persist-tun
proto tcp
remote <ip-address> <port>
http-proxy <ip-address> <port>
persist-remote-ip
resolv-retry infinite
connect-retry 0 1
remote-cert-tls server
nobind
reneg-sec 0
keysize 0
rcvbuf 0
sndbuf 0
verb 2
comp-lzo
auth none
auth-nocache
cipher none
setenv CLIENT_CERT 0
allow-compression yes
auth-user-pass
http-proxy-option VERSION 1.1
http-proxy-option AGENT Chrome/80.0.3987.87
http-proxy-option CUSTOM-HEADER "Host: <payload>"
http-proxy-option CUSTOM-HEADER "X-Online-Host: <payload>"
http-proxy-option CUSTOM-HEADER "X-Forward-Host: <payload>"
http-proxy-option CUSTOM-HEADER "Connection: Keep-Alive
4. Open HTTP Injector and Go to Payload Generator feature: (OK) means Check it!
Fill uo Payload from the OVPN Config that you copied
(OK) Online-Host
(OK) Forward-Host
(OK) Keep-Alive
(OK) Referrer
Then "Generate"
Copy Payload and....
4. Run You do not have permission to view the full content of this post. Log in or register now. to your browser and input username and password.
5. Go to "Settings" and do it as per tab.
OPENVPN:
- Import OVPN Config
- Input username and password from ovpn config
HTTP:
- Tunnel Type: HTTP
- Proxy and Port: http-proxy <ip-address> <port> from OVPN config
- Paste Payload from generated by HTTP Injector
- Then Save
6. Back to Dashboard and test it for success connection..