 PH
PHIf you are wondering about to build a computer by assemble it yourself and also wants to save all that assembling charges by the computer shop so, don’t worry about it because In this tutorial we show you how to assemble or build a computer PC by our own. Actually it’s such an easy task to do, you’ll just have to connect some plugs, tightens the screws and that’s it.
Before you’re going to assemble a computer, you’ll have to make sure that you have all the parts of the computer what requires to build a PC. You should know what you are going to build.
Picking up parts for your computer –
1. Processor – The first thing you have to pick is processor because it’s a brain of your computer. Processor is fully responsible for your system speed, more heavily you buy more performance you got. If you are going to make a decent pc just buy an i3 processor and that will works for you.
2. Motherboard – Second step is to do after choosing a processor is picking up a motherboard. Motherboard is main board where all your hardware going to be connected. Buying a motherboard is depends on processor’s socket. Every processor series have there one socket Number like LGA775, LGA1155, LGA1556. Check the motherboard specification is your processor is supportable or not, before you buying any
3. Ram – RAM is random access memory. It’s a fast version of a typical hard drive, and it’s used to store temporary information and data currently in use by your system (mainly operating system). The more RAM you have the better performance your machine gives you. You can think of RAM as tellers in a bank processing customers’ needs in real time. The more tellers you have (RAM), the faster the processing. Buy a RAM what’s your motherboard support; Normally all new motherboard comes with DDR3 ram support.
Recommend – 2 GB minimum
4. Hard Drive – hard drive is the computer’s main storage device which permanently stores all of your data on the computer. Buying a hard disk is totally depending on your use.
Recommend – 500 GB minimum
5. Computer Case – Pick the Right Size and Shape, a case’s size doesn’t need to be explained. Bigger cases can hold more optical drive & hard drives have room for bigger video cards, and are easy to fit everything.]
6. Power supply (SMPS) – SMPS is power house of your computer which supplies power to all the sections. We are selecting PSU by its power supply capacity to fulfill the power consumption of our computer. Here’s link which will helps you to choose and give you the right amount watt does you need in your computer.
PSU Calculator >>>> You do not have permission to view the full content of this post. Log in or register now.
7. Graphic card (optional) – if you are going to build a gaming pc then it does need a graphic card to play the games what you want to play on it. Graphic card are optional if you want a simple computer but if you wants to play some high end games on it, then select a good video card. Selecting a graphic card isn’t that simple that’s why we have another tutorial below to make selection easy for you.
Step 1: Collecting parts
First you have to buy these parts because it’s all are necessary to build the computer
1. Processor 2. Motherboard 3. Ram 4. Hard drive 5. Computer case 6. Power supply (SMPS) 7.Optical Drive (DVD RW and SATA capable) 8. SATA Cables (Comes with new motherboard) 9. Processor Fan (Comes with a new processor) 10. Case Fan 11. Assortment of case and drive screws
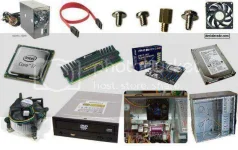
Caution: Double check the product specifications on all items before you purchase them. Kits are supposed to contain compatible parts.
Step 2: Gather Tools and Supplies
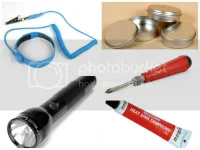
Gather the tools you will need for the project:
Step 3: Open The Case
Open the computer case by removing the screws that holds the side panels and then lifting it away from the case
Step 4: Prepare the Case for Assembly
Things need to be done before assembly:
Step 5: Ground Yourself
Wear a grounding strap on your wrist and connect the other end to your computer case. This will prevent any buildup of static electricity on your body because Static electricity can damage your computer components
Step 6: Install Motherboard
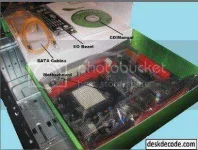
For a motherboard installation we need all the parts included in your purchased box:
1. Bezel –Bezel is a metal panel which interfaces the ports on the motherboard. You have to install it on the back of your cabinet
2. Install the standoff – install a standoff in the cabinet holes to make a gap between motherboard to a metal body
Now your cabinet looks like this –
3. Install the motherboard –
1. Insert the motherboard into the case align with bezel.
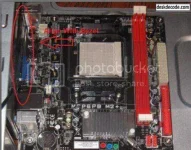
2. Install the screws.
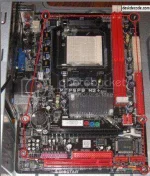
Step 7: Install the CPU
CPU is the brain of computer. It’s installed on the Motherboard’s CPU Socket shown in this picture
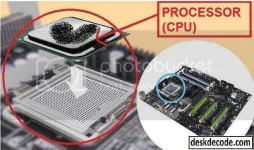
Install the CPU:
Step 8: Install The CPU Fan
CPU fan is a combination of a fan and heat sink. They draw heat away from the CPU.
Install the fan:
1. Put the thermal compound on the CPU.
2. Set the fan on the mounting case tabs aligned.
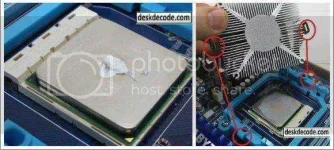
3. Lock the fan.
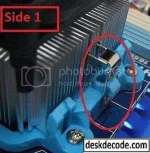
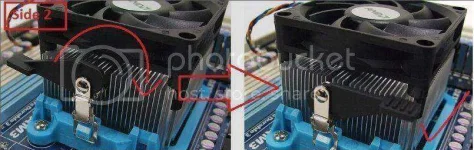
4. Connect the fan power connector to the motherboard.
Step 9: Install Hard Drive
Hard drive is a device which stores all of your computer data.
1. Find the right place for your hard disk.
2. Install the drive.
3. Install the screws.
Step 10: Install Optical Drive
1. Find a right place to install a optical drive
2. Make sure you remove the cover from the outside.
3. Slide the drive into the drive bay
4. Install the screws.
Step 11: Install RAM
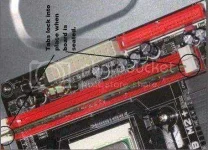
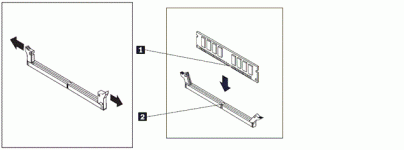
Note – Check the notch on the board is in the correct location. If it’s not turn around the RAM.
Step 12: Install Case Fan
Install the case fan:
1. Align the fan to the mounting holes and tighten the screws from the outside.
2. Connect the fan power connector.
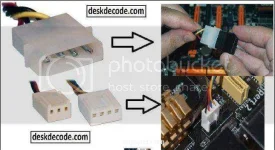
Step 13: Install Power Supply
1. Align the SMPS to mounting holes
2. Tighten the screw from the outside
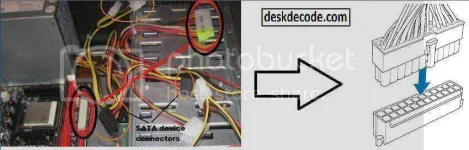
Step 14: Connect Cables
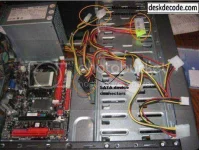
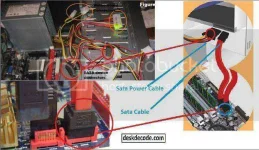
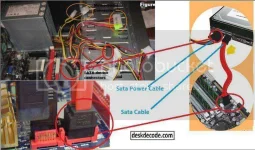
When you install all the hardware components in your computer, then it’s time to do connecting the cables.
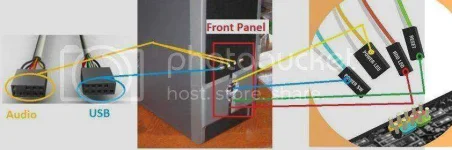
Step 15: Front Panel Jumper Connection
Step 1 – Learn jumper setting
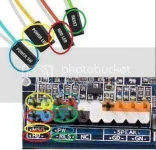
Step 2 – connect the jumper to the motherboard
Step 16: Wrapping-up
Now all the components are completely installed and the last thing to do is to attach the side panels on the cabinet. Your computer is now ready, just install an OS and GAME ON!!!
Before you’re going to assemble a computer, you’ll have to make sure that you have all the parts of the computer what requires to build a PC. You should know what you are going to build.
Picking up parts for your computer –
1. Processor – The first thing you have to pick is processor because it’s a brain of your computer. Processor is fully responsible for your system speed, more heavily you buy more performance you got. If you are going to make a decent pc just buy an i3 processor and that will works for you.
2. Motherboard – Second step is to do after choosing a processor is picking up a motherboard. Motherboard is main board where all your hardware going to be connected. Buying a motherboard is depends on processor’s socket. Every processor series have there one socket Number like LGA775, LGA1155, LGA1556. Check the motherboard specification is your processor is supportable or not, before you buying any
3. Ram – RAM is random access memory. It’s a fast version of a typical hard drive, and it’s used to store temporary information and data currently in use by your system (mainly operating system). The more RAM you have the better performance your machine gives you. You can think of RAM as tellers in a bank processing customers’ needs in real time. The more tellers you have (RAM), the faster the processing. Buy a RAM what’s your motherboard support; Normally all new motherboard comes with DDR3 ram support.
Recommend – 2 GB minimum
4. Hard Drive – hard drive is the computer’s main storage device which permanently stores all of your data on the computer. Buying a hard disk is totally depending on your use.
Recommend – 500 GB minimum
5. Computer Case – Pick the Right Size and Shape, a case’s size doesn’t need to be explained. Bigger cases can hold more optical drive & hard drives have room for bigger video cards, and are easy to fit everything.]
6. Power supply (SMPS) – SMPS is power house of your computer which supplies power to all the sections. We are selecting PSU by its power supply capacity to fulfill the power consumption of our computer. Here’s link which will helps you to choose and give you the right amount watt does you need in your computer.
PSU Calculator >>>> You do not have permission to view the full content of this post. Log in or register now.
7. Graphic card (optional) – if you are going to build a gaming pc then it does need a graphic card to play the games what you want to play on it. Graphic card are optional if you want a simple computer but if you wants to play some high end games on it, then select a good video card. Selecting a graphic card isn’t that simple that’s why we have another tutorial below to make selection easy for you.
- You do not have permission to view the full content of this post. Log in or register now.
- You do not have permission to view the full content of this post. Log in or register now.
Step 1: Collecting parts
First you have to buy these parts because it’s all are necessary to build the computer
1. Processor 2. Motherboard 3. Ram 4. Hard drive 5. Computer case 6. Power supply (SMPS) 7.Optical Drive (DVD RW and SATA capable) 8. SATA Cables (Comes with new motherboard) 9. Processor Fan (Comes with a new processor) 10. Case Fan 11. Assortment of case and drive screws
Caution: Double check the product specifications on all items before you purchase them. Kits are supposed to contain compatible parts.
Step 2: Gather Tools and Supplies
Gather the tools you will need for the project:
- Screwdriver (for slotted and Phillips head screws)
- Small flashlight
- Small container to hold screws
- Heat sink compound
- Antistatic wrist strap
Step 3: Open The Case
Open the computer case by removing the screws that holds the side panels and then lifting it away from the case
Step 4: Prepare the Case for Assembly
Things need to be done before assembly:
- Remove any parts or package that may be comes inside the case.
- Remove the cover for optical drive on the front of your computer case.
- Check the front panel connector labeling. If they are not labeled, read the manufacturer’s manual and label them yourself.
Step 5: Ground Yourself
Wear a grounding strap on your wrist and connect the other end to your computer case. This will prevent any buildup of static electricity on your body because Static electricity can damage your computer components
Step 6: Install Motherboard
For a motherboard installation we need all the parts included in your purchased box:
1. Bezel –Bezel is a metal panel which interfaces the ports on the motherboard. You have to install it on the back of your cabinet
2. Install the standoff – install a standoff in the cabinet holes to make a gap between motherboard to a metal body
Now your cabinet looks like this –
3. Install the motherboard –
1. Insert the motherboard into the case align with bezel.
2. Install the screws.
Step 7: Install the CPU
CPU is the brain of computer. It’s installed on the Motherboard’s CPU Socket shown in this picture
Install the CPU:
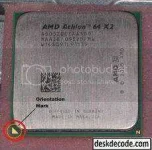
- Find the mark on the corner of processor that defines designates of pin 1. We are using an AMD processor in this tutorial
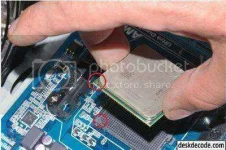
- Lift up the metal rod on the socket
- Find the corresponding marking on socket
- Insert the CPU as the markings are lined up.
- Push the rod down to lock the processor.
Step 8: Install The CPU Fan
CPU fan is a combination of a fan and heat sink. They draw heat away from the CPU.
Install the fan:
1. Put the thermal compound on the CPU.
2. Set the fan on the mounting case tabs aligned.
3. Lock the fan.
4. Connect the fan power connector to the motherboard.
Step 9: Install Hard Drive
Hard drive is a device which stores all of your computer data.
1. Find the right place for your hard disk.
2. Install the drive.
3. Install the screws.
Step 10: Install Optical Drive
1. Find a right place to install a optical drive
2. Make sure you remove the cover from the outside.
3. Slide the drive into the drive bay
4. Install the screws.
Step 11: Install RAM
- Insert the RAM to the motherboard, press the RAM from upwards.
Note – Check the notch on the board is in the correct location. If it’s not turn around the RAM.
Step 12: Install Case Fan
Install the case fan:
1. Align the fan to the mounting holes and tighten the screws from the outside.
2. Connect the fan power connector.
Step 13: Install Power Supply
1. Align the SMPS to mounting holes
2. Tighten the screw from the outside
Step 14: Connect Cables
When you install all the hardware components in your computer, then it’s time to do connecting the cables.
- Connect the CPU power connector.
- Connect the Motherboard power connector.
- Connect the Optical Drive Power connector & SATA Cables.
- Connect the Hard Drive power connector & SATA Cables.
Step 15: Front Panel Jumper Connection
Step 1 – Learn jumper setting
Step 2 – connect the jumper to the motherboard
Step 16: Wrapping-up
Now all the components are completely installed and the last thing to do is to attach the side panels on the cabinet. Your computer is now ready, just install an OS and GAME ON!!!

